集成装修全屋定制福州seo公司排名
目录
1. 一维数组的创建和初始化。
1.1 数组的创建
1.2 数组的初始化
1.3 一维数组的使用
1.4 一维数组在内存中的存储
2. 二维数组的创建和初始化
2.1 二维数组的创建
2.2 二维数组的初始化
2.3 二维数组的使用
2.4 二维数组在内存中的存储
3. 数组越界
4. 冒泡函数的设计
5.三子棋
6.带标记和BFS的扫雷游戏
1. 一维数组的创建和初始化。
1.1 数组的创建
数组是一组相同类型元素的集合。
数组的创建方式:
type_t arr_name [const_n];
//type_t 是指数组的元素类型
//const_n 是一个常量表达式,用来指定数组的大小
数组创建的实例:
//代码1
int arr1[10];
//代码2
int count = 10;
int arr2[count];//数组时候可以正常创建?
//代码3
char arr3[10];
float arr4[1];
double arr5[20];
注:数组创建,在C99标准之前, [] 中要给一个常量才可以,不能使用变量。在C99标准支持了变长数组的概念。

1.2 数组的初始化
数组的初始化是指,在创建数组的同时给数组的内容一些合理初始值(初始化)。
看代码:
int arr1[10] = {1,2,3};
int arr2[] = {1,2,3,4};
int arr3[5] = {1,2,3,4,5};
char arr4[3] = {'a',98, 'c'};
char arr5[] = {'a','b','c'};
char arr6[] = "abcdef";
数组在创建的时候如果想不指定数组的确定的大小就得初始化。数组的元素个数根据初始化的内容来确定。
但是对于下面的代码要区分,内存中如何分配。
char arr1[] = "abc"; (自带‘\0’)
char arr2[3] = {'a','b','c'};
1.3 一维数组的使用
对于数组的使用我们之前介绍了一个操作符: [] ,下标引用操作符。它其实就数组访问的操作符。
我们来看代码:
#include <stdio.h>
int main()
{
int arr[10] = {0};//数组的不完全初始化//计算数组的元素个数int sz = sizeof(arr)/sizeof(arr[0]);
//对数组内容赋值,数组是使用下标来访问的,下标从0开始。所以:
int i = 0;//做下标
for(i=0; i<10; i++)//
{
arr[i] = i;
}
//输出数组的内容
for(i=0; i<10; ++i)
{
printf("%d ", arr[i]);
}
return 0;
}
总结:
1. 数组是使用下标来访问的,下标是从0开始。
2. 数组的大小可以通过计算得到。
int arr[10];
int sz = sizeof(arr)/sizeof(arr[0]);
1.4 一维数组在内存中的存储
接下来我们探讨数组在内存中的存储。
include <stdio.h>
int main()
{
int arr[10] = {0};
int i = 0;int sz = sizeof(arr)/sizeof(arr[0]);for(i=0; i<sz; ++i)
{
printf("&arr[%d] = %p\n", i, &arr[i]);
}
return 0;
}
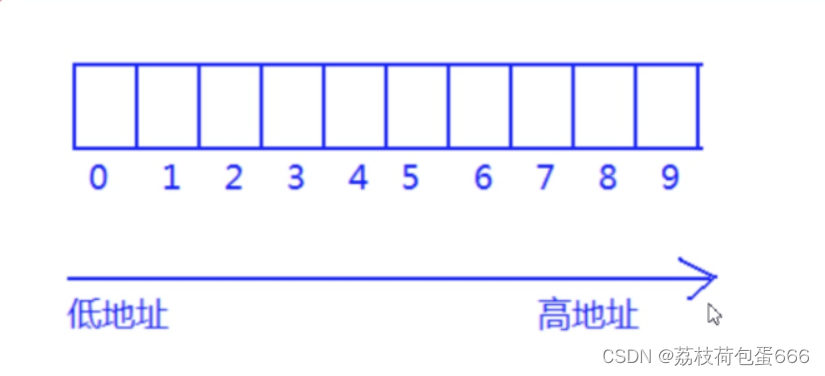
仔细观察输出的结果,我们知道,随着数组下标的增长,元素的地址,也在有规律的递增。
由此可以得出结论:数组在内存中是连续存放的。
2. 二维数组的创建和初始化
2.1 二维数组的创建
//数组创建
int arr[3][4];
char arr[3][5];
double arr[2][4];
2.2 二维数组的初始化
//数组初始化
int arr[3][4] = {1,2,3,4};
int arr[3][4] = {{1,2},{4,5}};
int arr[][4] = {{2,3},{4,5}};//二维数组如果有初始化,行可以省略,列不能省略
2.3 二维数组的使用
二维数组的使用也是通过下标的方式。
看代码:
#include <stdio.h>
int main()
{
int arr[3][4] = {0};
int i = 0;
for(i=0; i<3; i++)
{
int j = 0;
for(j=0; j<4; j++)
{
arr[i][j] = i*4+j;
}
}
for(i=0; i<3; i++)
{
int j = 0;
for(j=0; j<4; j++)
{
printf("%d ", arr[i][j]);
}
}
return 0;
}
2.4 二维数组在内存中的存储
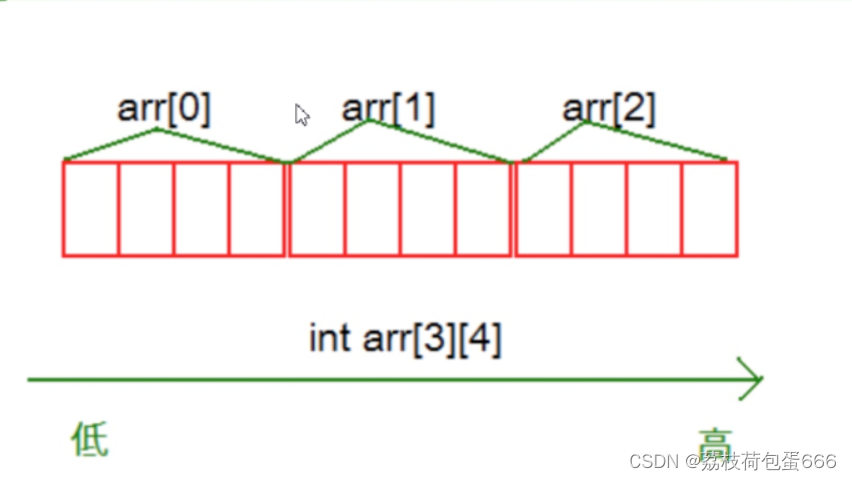
像一维数组一样,这里我们尝试打印二维数组的每个元素。
#include <stdio.h>
int main()
{
int arr[3][4];
int i = 0;
for(i=0; i<3; i++)
{
int j = 0;
for(j=0; j<4; j++)
{
printf("&arr[%d][%d] = %p\n", i, j,&arr[i][j]);
}
}
return 0;
} 
通过结果我们可以分析到,其实二维数组在内存中也是连续存储的。
3. 数组越界
数组的下标是有范围限制的。
数组的下规定是从0开始的,如果数组有n个元素,最后一个元素的下标就是n-1。
所以数组的下标如果小于0,或者大于n-1,就是数组越界访问了,超出了数组合法空间的访问。
C语言本身是不做数组下标的越界检查,编译器也不一定报错,但是编译器不报错,并不意味着程序就是正确的,
所以我们平时要经常做越界的检查。
#include <stdio.h>
int main()
{
int arr[10] = {1,2,3,4,5,6,7,8,9,10};int i = 0;for(i=0; i<=10; i++){printf("%d\n", arr[i]);//当i等于10的时候,越界访问了}
return 0;
}
二维数组的行和列也可能存在越界
4. 冒泡函数的设计
实现一个冒泡排序函数将一个整形数组排序。
补充:
1. sizeof(数组名),计算整个数组的大小,sizeof内部单独放一个数组名,数组名表示整个数
组。
2. &数组名,取出的是数组的地址。&数组名,数组名表示整个数组。
除此1,2两种情况之外,所有的数组名都表示数组首元素的地址。
#include <stdio.h>
void bubble_sort(int arr[], int sz)//参数接收数组元素个数
{int sz = sizeof(arr)/sizeof(arr[0]);//这样对吗?int i = 0;
for(i=0; i<sz-1; i++){int j = 0;for(j=0; j<sz-i-1; j++){if(arr[j] > arr[j+1]){int tmp = arr[j];arr[j] = arr[j+1];arr[j+1] = tmp;}}}
}
int main()
{int arr[] = {3,1,7,5,8,9,0,2,4,6};int sz = sizeof(arr)/sizeof(arr[0]);bubble_sort(arr, sz);for(i=0; i<sz; i++){printf("%d ", arr[i]);}return 0;
}
5.三子棋
有我很早之前一篇博客
6.带标记和BFS的扫雷游戏
game.c
#define _CRT_SECURE_NO_WARNINGS 1
#include"game.h"//初始化数组
void InitBoard(char board[ROWS][COLS], int rows, int cols, char set)
{int i = 0;for (i = 0; i < rows; i++){int j = 0;for (j = 0; j < cols; j++){board[i][j] = set;}}
}//打印棋盘
void DisplayBoard(char board[ROWS][COLS], int row, int col)
{int i = 0;printf("----------------扫雷游戏----------------\n");for (i = 0; i <= col; i++){printf("%d ", i);}printf("\n");for (i = 1; i <= 9; i++){printf("%d ", i);int j = 0;for (j = 1; j <= 9; j++){printf("%c ", board[i][j]);}printf("\n");}
}//布置雷
void SetMine(char board[ROWS][COLS], int row, int col)
{//布置10个雷//随机生成十个随机坐标,布置雷int count = COUNT;while (count){int x = rand()%row+1;int y = rand()%col+1;if (board[x][y] == '0'){board[x][y] = '1';count--;}}
}//统计周围雷的个数
int  GetMineCount(char mine[ROWS][COLS], int x, int y)
{return (mine[x - 1][y] + mine[x - 1][y - 1] + mine[x][y - 1] + mine[x + 1][y - 1] + mine[x + 1][y]+ mine[x + 1][y + 1] + mine[x][y + 1] + mine[x - 1][y + 1] - 8 * '0');
}//爆炸展开
void ExplodeBoard(char mine[ROWS][COLS], char show[ROWS][COLS], int row, int col, int x, int y,int* p)
{int temp = *p;temp++;//限制条件if (x >= 1 && x <= row && y >= 1 && y <= col){//计算该位置周围雷的个数int count = GetMineCount(mine, x, y);if (count == 0){//把该位置变成空格show[x][y] = ' ';int i = 0;//向周围进行递归遍历for (i = x - 1; i <= x + 1; i++){int j = 0;for (j = y - 1; j <= y + 1; j++){//限制对重复递归调用的条件,避免死递归if (show[i][j] == '*'){temp++;ExplodeBoard(mine, show, row, col, i, j,&temp);}}}}else{show[x][y] = count + '0';}}
}//标记雷的函数
void Signmine(char board[ROWS][COLS], int row, int col)
{int x = 0;int y = 0;while (1){printf("请输入要标记的坐标:");scanf("%d %d", &x, &y);if (x >= 1 && x <= row && y >= 1 && y <= col){if (board[x][y] == '*'){board[x][y] = '!';break;}else{printf("该位置不能被标记,请重新输入:\n");}}else{printf("坐标非法,请重新输入:\n");}}
}
//排查雷的函数
void FindMine(char mine[ROWS][COLS], char show[ROWS][COLS], int row, int col)
{int x = 0;int y = 0;int win = 0;char ch = 0;while (win < ROW*COL-COUNT){printf("输入所要排查的目标:\n");scanf("%d %d", &x, &y);if (x >= 1 && x <= row && y >= 1 && y <= col)//检查坐标是否合法{if (mine[x][y] == '1'){printf("很遗憾,你被炸死了。\n");DisplayBoard(mine,ROW,COL);break;}else{//爆炸展开ExplodeBoard(mine, show, row, col,x,y,&win);//打印棋盘DisplayBoard(show, ROW, COL);printf("需要标注地雷输入:Y,不需要则输入:N\n");//清空缓冲区while ((ch = getchar()) != '\n');scanf("%c", &ch);if (ch == 'Y'){//标记雷的位置Signmine(show, ROW, COL);}}}else{printf("坐标非法,重新输入:\n");}//打印棋盘DisplayBoard(show, ROW, COL);}if (win == ROW * COL - COUNT){printf("恭喜你,排雷成功\n");DisplayBoard(mine, ROW, COL);}
}
game.h
#pragma once
#include<stdio.h>
#include<time.h>
#include<stdlib.h>#define ROW 9
#define COL 9#define ROWS ROW+2
#define COLS COL+2//雷的个数
#define COUNT 10//初始化数组函数的声明
void InitBoard(char board[ROWS][COLS], int rows, int cols, char set);//打印棋盘数组的函数声明
void DisplayBoard(char board[ROWS][COLS], int row, int col);//布置雷的函数声明
void SetMine(char board[ROWS][COLS], int row, int col);//排查雷的函数声明
void FindMine(char mine[ROWS][COLS], char show[ROWS
test.c
#define _CRT_SECURE_NO_WARNINGS 1
#include"game.h"void menu()
{printf("*****************************\n");printf("*********1.play**************\n");printf("*********0.exit**************\n");printf("*****************************\n");
}
void game()
{char mine[ROWS][COLS];//存放布置雷的信息char show[ROWS][COLS];//存放排查雷的信息//初始化棋盘//1,mine数组最开始全是‘0’//2,show数组最开始全是‘*’InitBoard(mine, ROWS, COLS, '0');InitBoard(show, ROWS, COLS, '*');//打印棋盘//DisplayBoard(mine, ROW, COL);DisplayBoard(show, ROW, COL);//布置雷SetMine(mine, ROW, COL);//DisplayBoard(mine, ROW, COL);//排查雷FindMine(mine, show, ROW, COL);}
int main()
{int input = 0;srand((unsigned int)time(NULL));do{menu();printf("请选择:");scanf("%d", &input);switch (input){case 1:game();break;case 0:printf("退出游戏\n");default:printf("选择错误,请重新选择\n");break;}} while (input);return 0;
}