网站创意设计公司手机网站推荐大全

目录
1.前言:顺序表回顾:
1.1顺序表的优缺点
2.主角----链表
2.1链表的概念
2.2定义一个单链表的具体实现代码方式
3.单链表对数据的管理----增删查改
3.1单链表的创建
3.2单链表的遍历实现
3.2.1利用遍历实现一个打印我们链表内容的函数的函数
3.3头插法----从头部插入数据实现
3.4尾插法---从尾部插入数据
3.5尾删法-----从尾部删除数据
3.6头删法
3.7寻找函数
3.8修改函数
3.9在pos位置前插入
3.10在pos位置后插入
3.11在pos位置前删除
3.12在pos位置后一个位置删除
3.13在pos位置删除
4.补充链表类型暂时了解
5.结语
1.前言:顺序表回顾:
顺序表知识回顾
1.1顺序表的优缺点
- 优点:
1.尾插、尾删速度足够快
2.可以使用下标来进行随机访问和数据修改
- 缺点:
1. 中间/头部的插入删除,时间复杂度为O(N)
2. 增容需要申请新空间,拷贝数据,释放旧空间。会有不小的消耗。比如我们realloc增添空间还会涉及到原始空间数据的拷贝和原始空间的释放。
3. 增容一般是呈2倍的增长,势必会有一定的空间浪费。例如当前容量为100,满了以后增容到 200,我们再继续插入了5个数据,后面没有数据插入了,那么就浪费了95个数据空间。
为了解决单链表的这缺点,于是我们引入了链表,链表优点(可以按需申请空间)
2.主角----链表
(今天重要讲解单链表),链表具有八种结构
2.1链表的概念
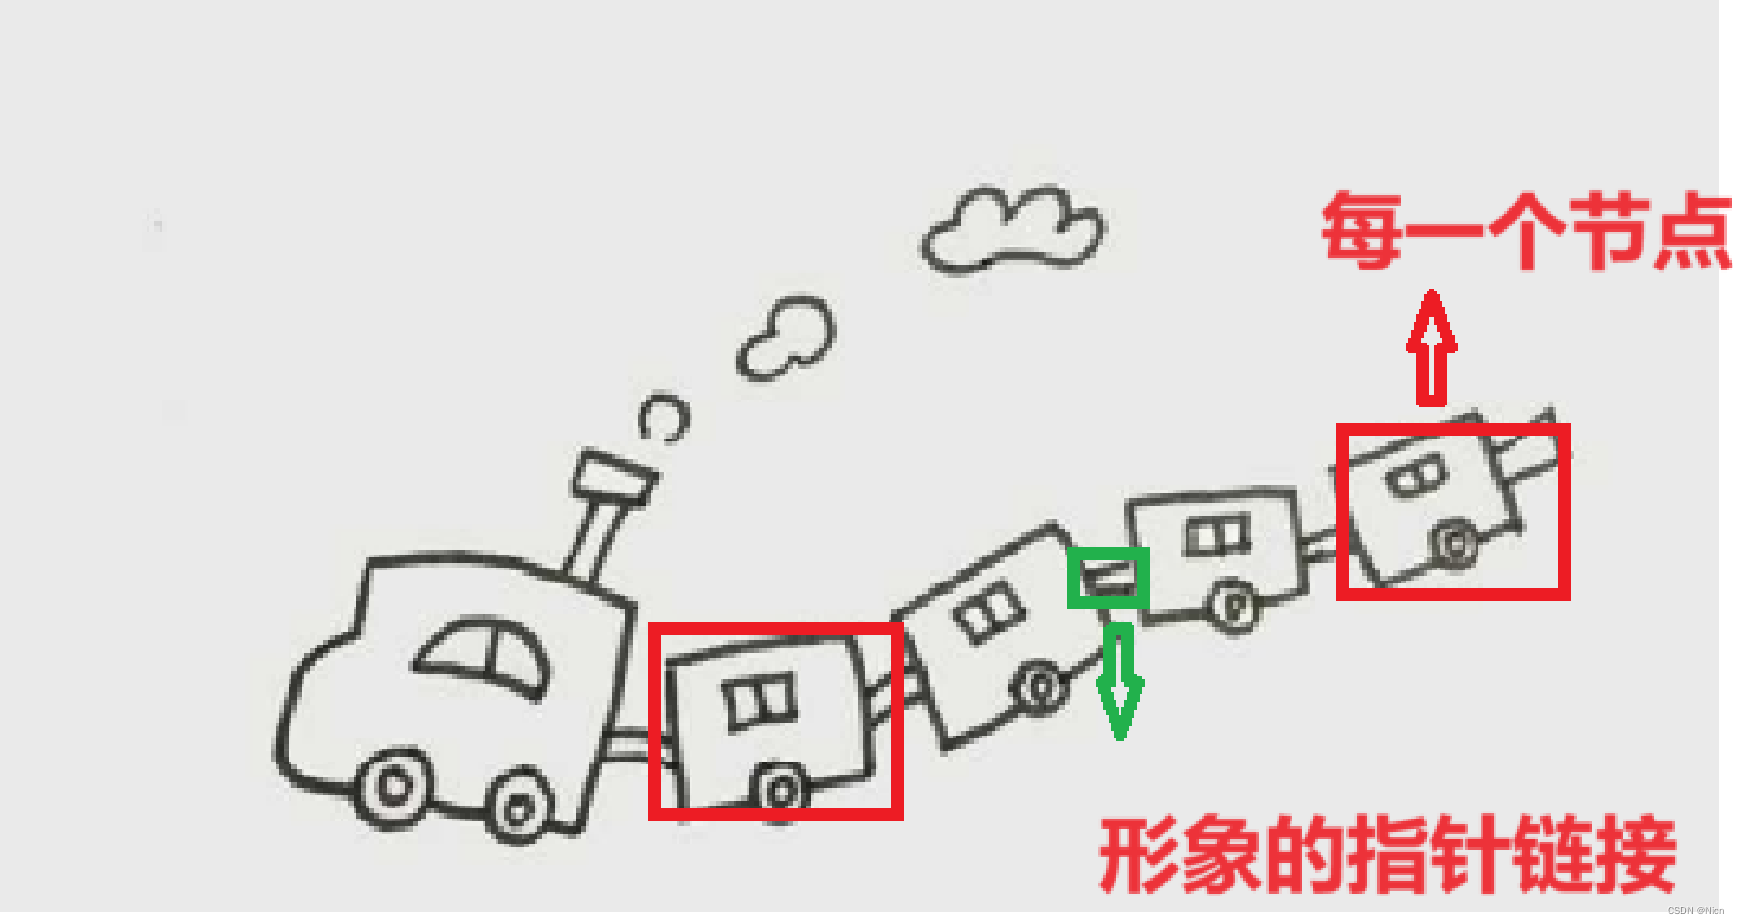
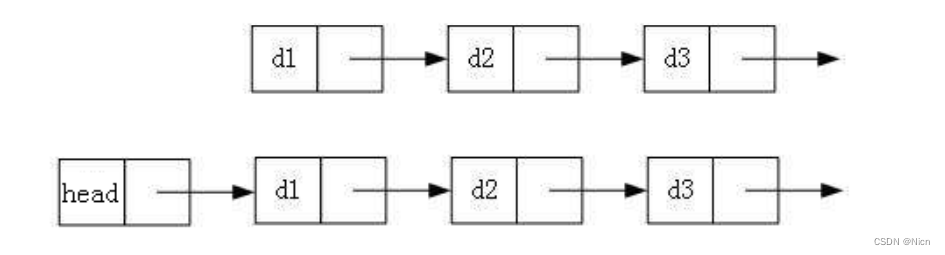
链表是一种物理存储结构上非连续、非顺序的存储结构,数据元素的逻辑顺序是通过链表 中的指针链接次序实现的 。就像火车:
2.2单链表的结构演示
在数据结构中,我们往往会以创建结构体的方式来实现链表,在结构体中定义至少定义两个成员:一个保存我们当前节点的数据,我们称为数据域,另外一个成员保存下一个节点的地址,我们称为指针域。

从上图,我们就可以发现,链式结构在逻辑上是连续的就是我们可以通过指针顺序找到链表中的每个节点但是,在物理上不一定连续,因为我们每一个节点的空间都是通过malloc在堆上申请开辟的空间,那么地址可能不连续。
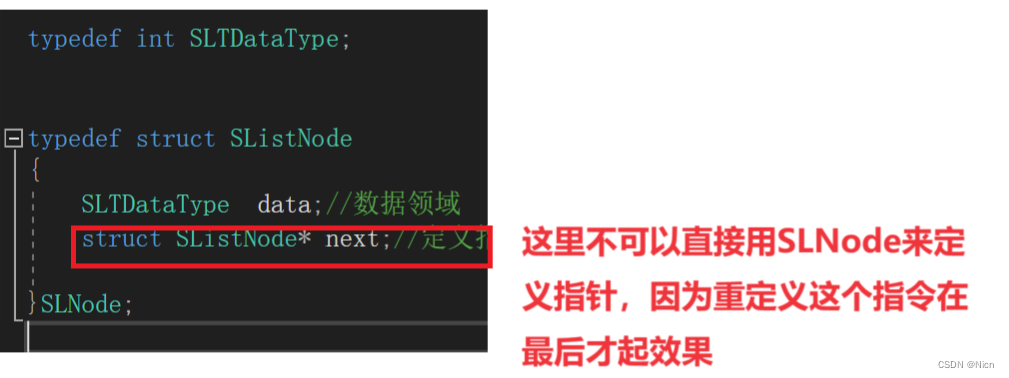
2.2定义一个单链表的具体实现代码方式
typedef int SLTDataType;typedef struct SListNode
{SLTDataType  data;//数据领域struct SListNode* next;//定义指针领域,方便保存下一个节点的地址}SLNode;
为了后期使用方便,我把整型这个类型重新定义了一下,后续如果需要改变我们这个程序中的数据类型,比如换成doubble类型,我们换一下宏定义就好。
3.单链表对数据的管理----增删查改
3.1单链表的创建
有了结构体类型,那我们就可以创建一个单链表:
1.首先我们先创建一个节点,由于后续插入等等操作都要创建节点,这里我们就可以将节点创建过程分装为一个函数:
SLNode* BuySListNode(SLTDataType x)
{//首先为我们的节点申请空间,创建一个节点,就申请这个结构体类型那么大的一个空间就行SLNode* newnode = (SLNode*)malloc(sizeof(SLNode));//判断一下是否开辟成功if (newnode == NULL){perror("malloc");exit(-1);}//开辟成功,就初始化这个节点newnode->data = x;newnode->next = NULL;return newnode;//返回节点地址
}
2.然后我们将每个节点链接起来,通个指针和每个节点的地址,这里就涉及头部插入数据和尾部插入数据,我们放在下面实现:
3.2单链表的遍历实现

3.2.1利用遍历实现一个打印我们链表内容的函数的函数
void SLPrint(SLNode* phead)
{SLNode* cur = phead;while (cur){printf("%d ->", cur->data);cur = cur->next;//指针移动到下一个节点}printf("NULL");}
3.3头插法----从头部插入数据实现
首先,我们先定义准备一个头指针,用于保存我们链表第一个节点的地址,,方便我们后期使用整块链表。
然后,当我们还没有链表,这时候放入第一个节点:
我们把节点地址给我们的头指针就好。
2.当我们的头指针不为空,这时要插入数据
应该将第一个节点的地址赋值给newnode的next,然后将我们newnode节点作为我们的心的头结点将地址给头指针。
两种情况可以视为一种情况,只是第一种特殊一下,我们的头指针指向空。
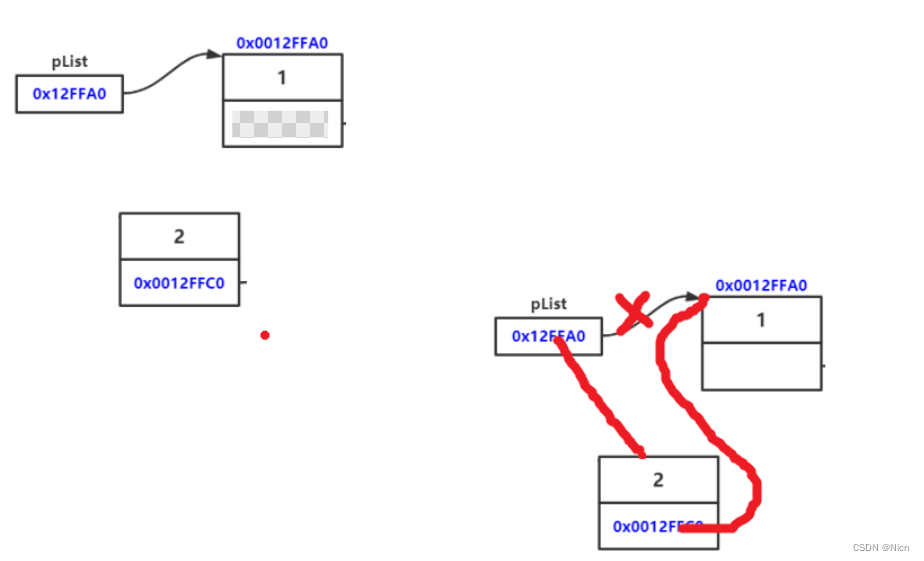
注意:在我们写头插函数的时候,传递的是头指针的地址,我们在函数中解引用操作操作的是原先的指针,这样才能整体使用我们的空间,如果我们只是传指针,那么在我们的头插函数中的头指针,只是我们真正头指针的一份拷贝,这样函数结束,形参就销毁,虽然空间开辟了,但是调用结束我们使用的还是原来没插入前的空间。
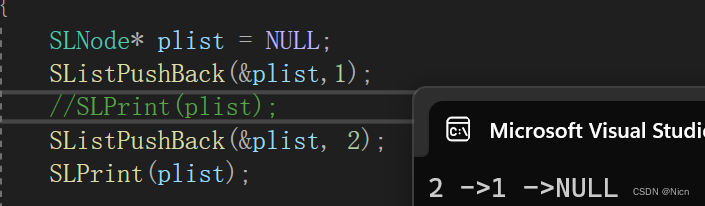
void SListPushBack(SLNode** phead,int x)
{SLNode* newnode = BuySListNode(x);newnode->next = *phead;*phead = newnode;}

3.4尾插法---从尾部插入数据

当我们还没有链表,这时候放入第一个节点:
两种情况实现:
void SLTPushBack(SLNode** phead, SLTDataType x)
{SLNode* newnode = BuySListNode(x);//创建新节点if (*phead == NULL){newnode->next = *phead;*phead = newnode;}else{SLNode* cur =*phead;while (cur->next){cur = cur->next;}cur->next = newnode;}}


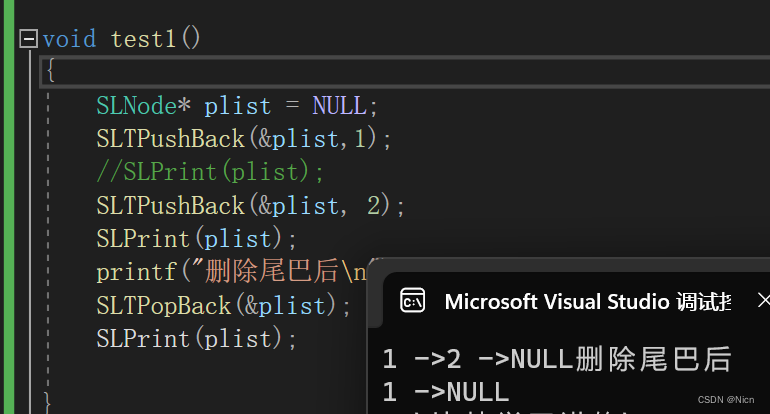
3.5尾删法-----从尾部删除数据
- ①当我们没有链表此时没有删除的东西,所以不能传入空指针
- ②当我们只有一个节点要删除

那么由于我们头指针有所改变,所以函数传参还是传递我们的头指针的地址
- ③当有很多节点
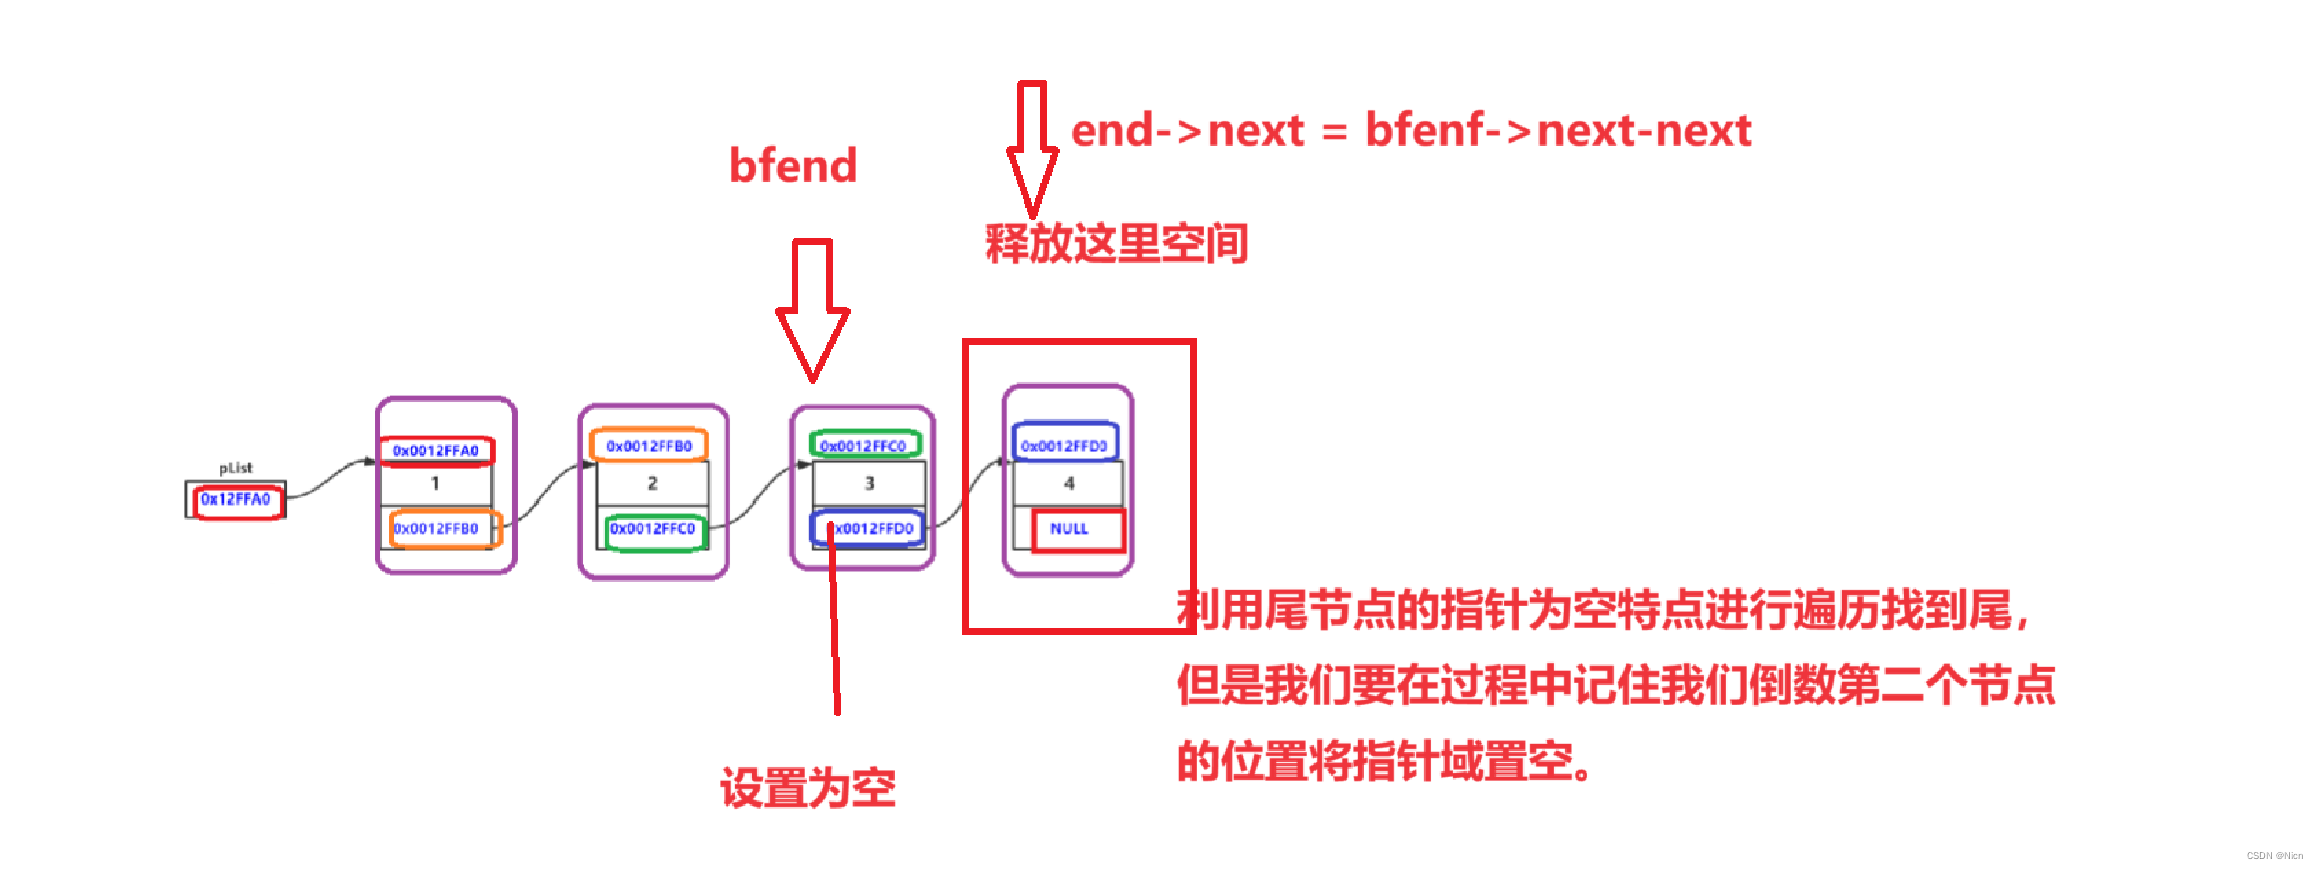
尽量不用->next->next=NULl的形式做判断,当只有一个节点的时候越界访问。
实现一下:
void SLTPopBack(SLNode** phead)
{assert(*phead);//头指针不能为空if ((*phead)->next == NULL){free(*phead);*phead = NULL;}else{SLNode* bfend = NULL;SLNode* end = *phead;while (end->next){bfend = end;end = end->next;}free(bfend->next);bfend->next = NULL;}
}
3.6头删法
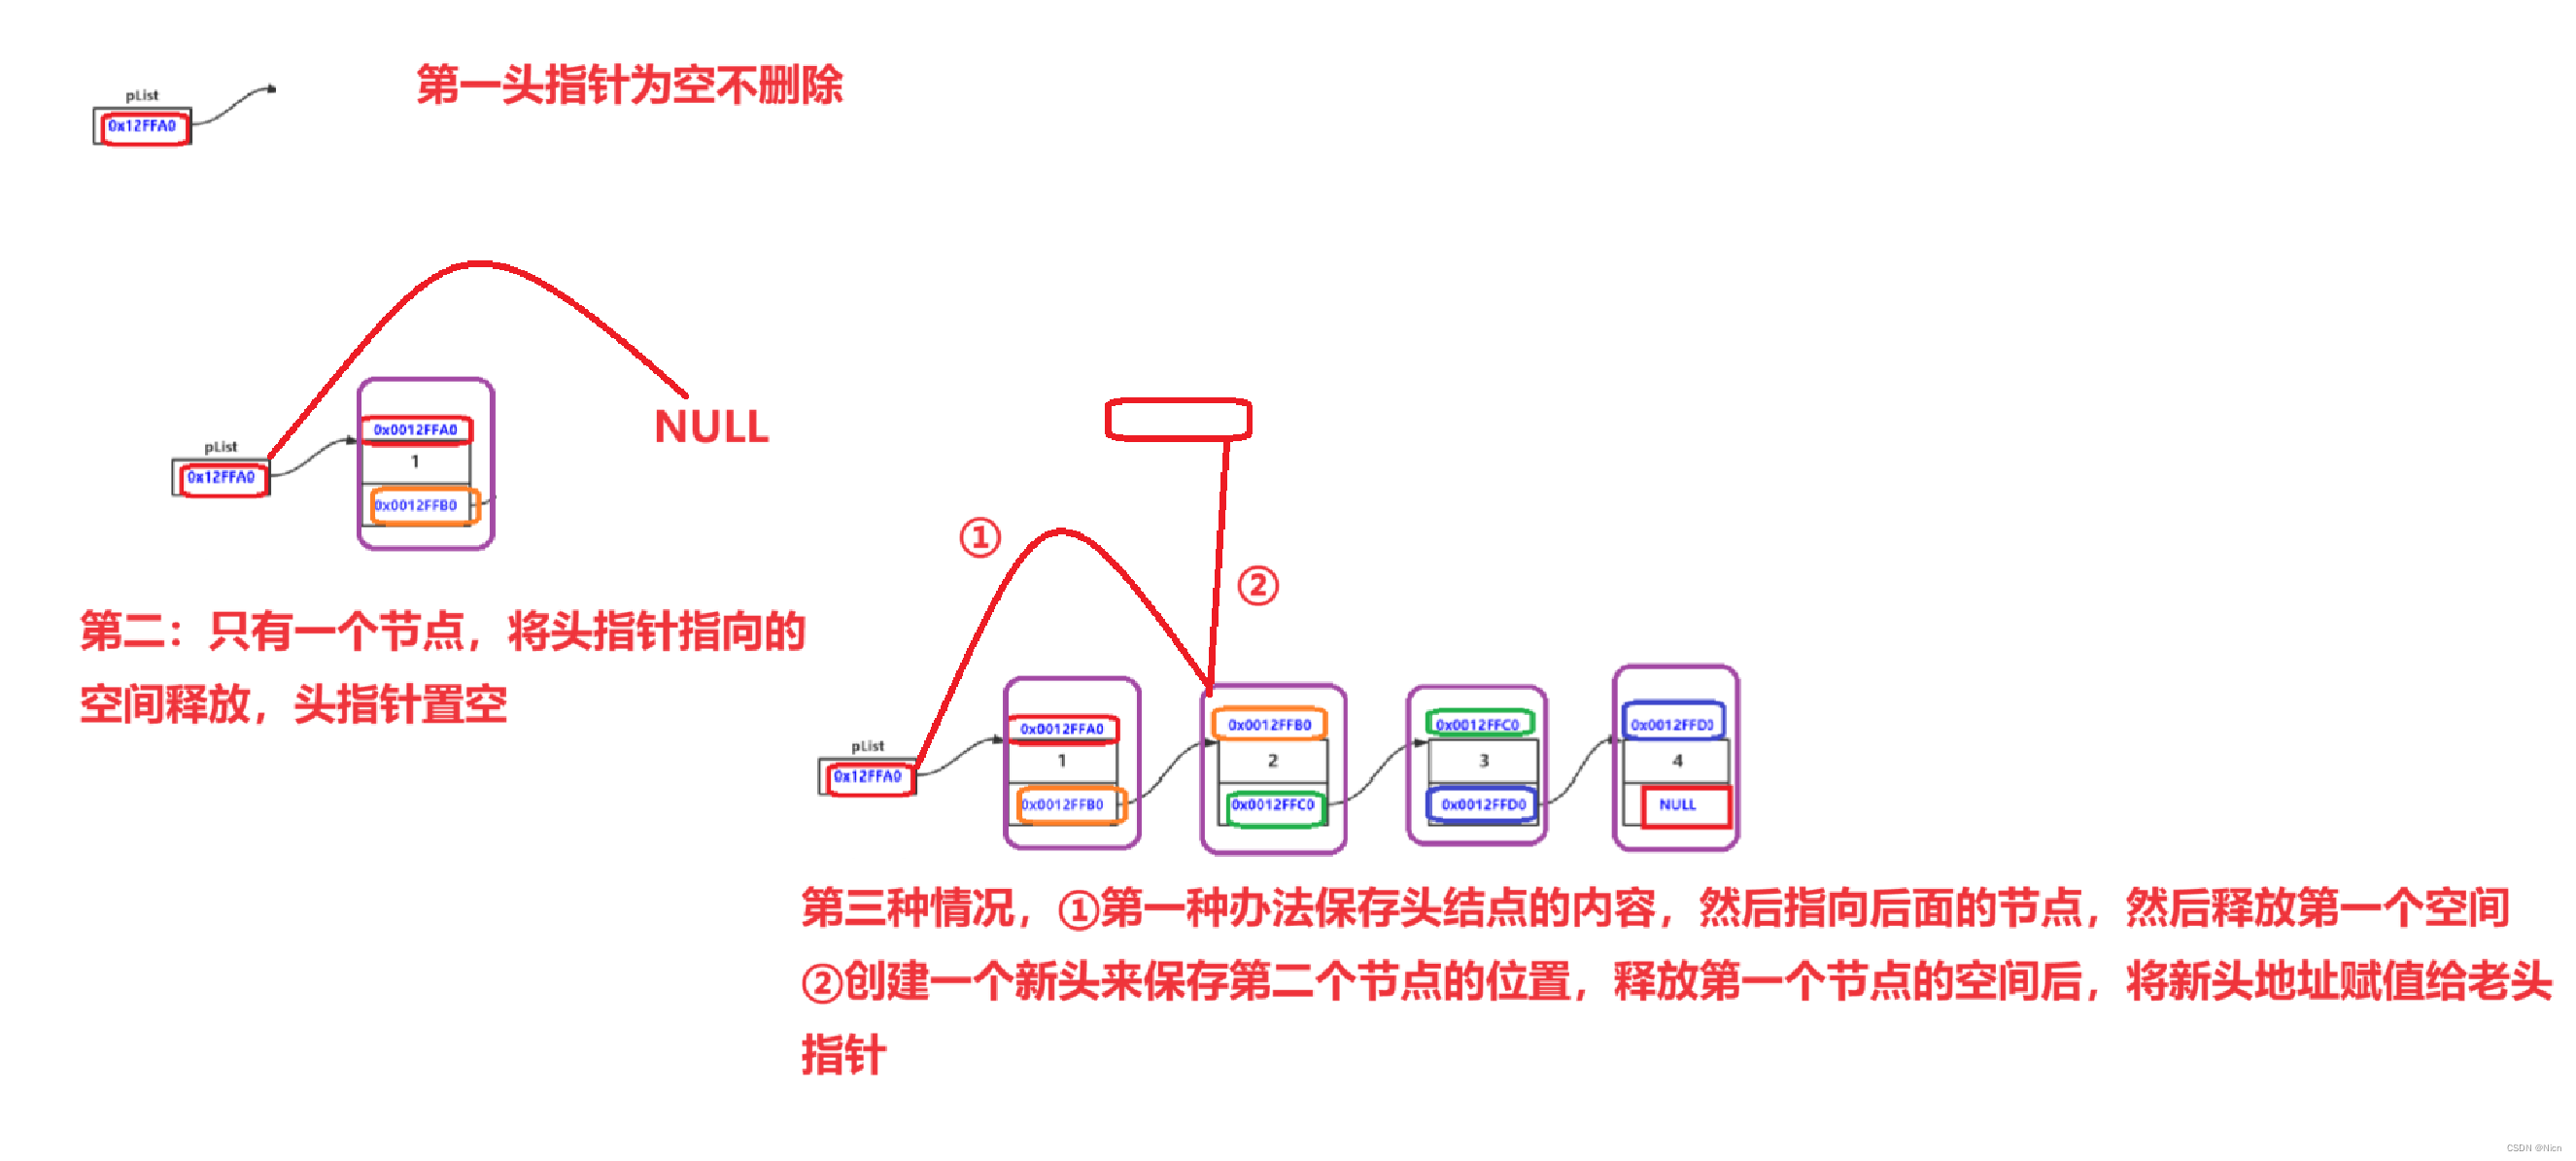
void SLTPopFront(SLNode** phead)
{assert(*phead);//当头指针非空SLNode* newnode =(*phead)->next;(*phead)->next = NULL;free(*phead);*phead = newnode;
}

3.7寻找函数
遍历寻找某个值
SLNode* SLFind(SLNode* phead, SLTDataType x)
{SLNode* cur = phead;while (cur){if (cur->data == x){return cur;}cur = cur->next;}return NULL;}
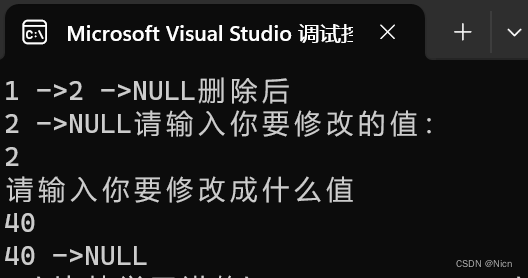
3.8修改函数
找到值返回对应位置的指针,然后通过指针修改
void  SLMod(SLNode* phead)
{int x = 0;printf("请输入你要修改的值:\n");scanf("%d", &x);SLNode* ret = SLFind(phead, x);if (ret){printf("请输入你要修改成什么值\n");int c = 0;scanf("%d", &c);ret->data = c;}
}
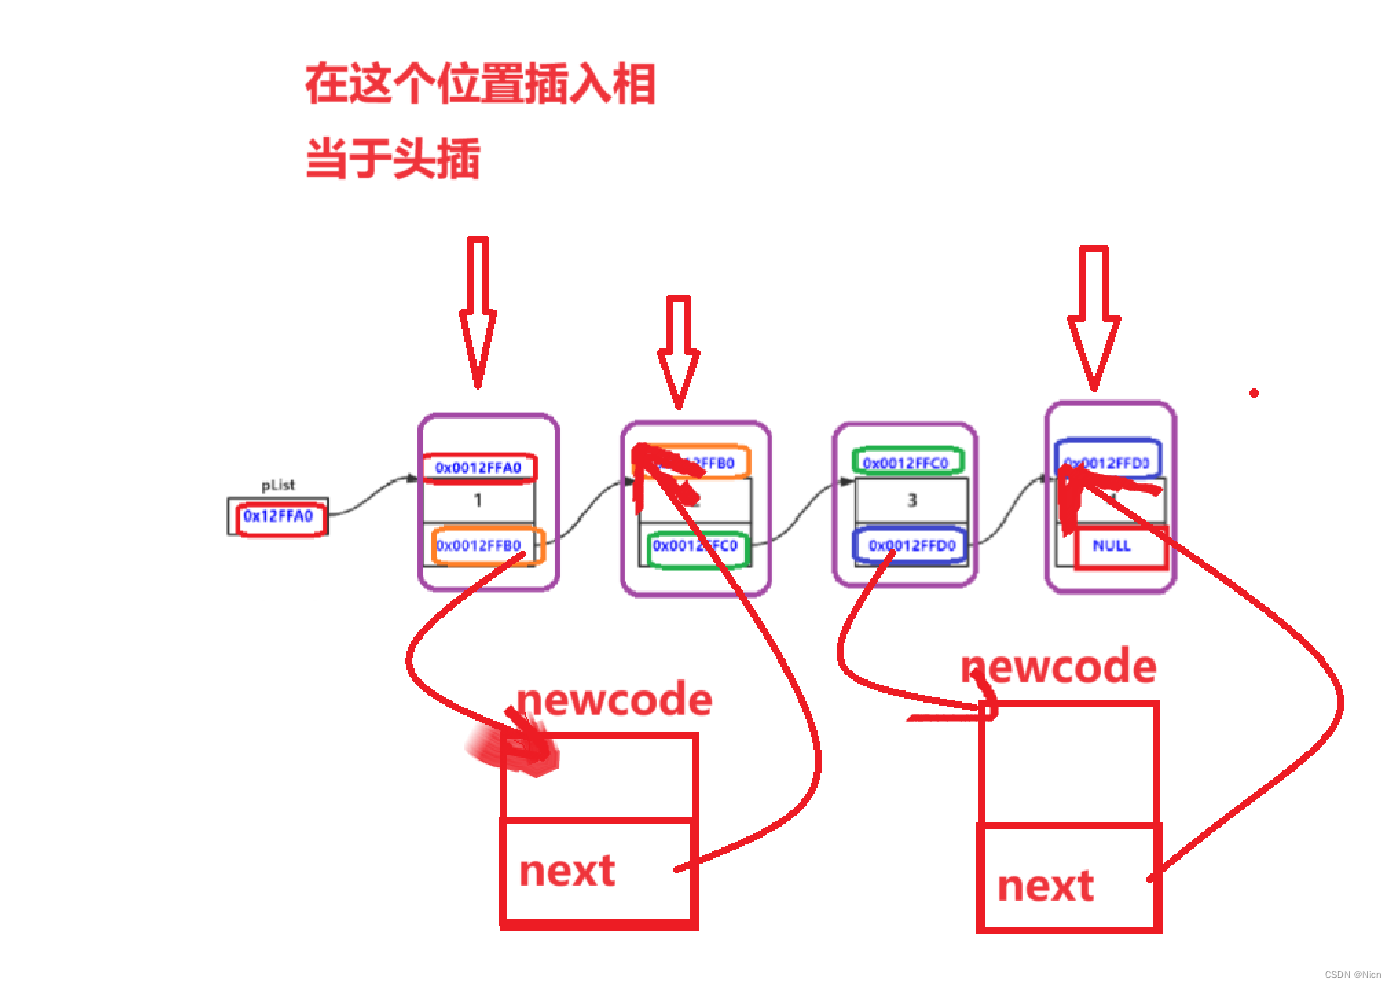
3.9在pos位置前插入
涉及到头插,就要涉及头指针的改变,那么我们就要传二级指针:
void SLTInsert(SLNode** phead, SLNode* pos, SLTDataType x)
{//不能传入空指针assert(pos);if (pos == *phead)//头插{SListPushBack(phead, x);}else{//先遍历到要插入的位置前一个SLNode* pre = *phead;while (pre->next != pos){pre = pre->next;}//然后插入这个新节点,开辟新节点SLNode* newnode = BuySListNode(x);pre->next = newnode;newnode->next = pos;}
}

3.10在pos位置后插入
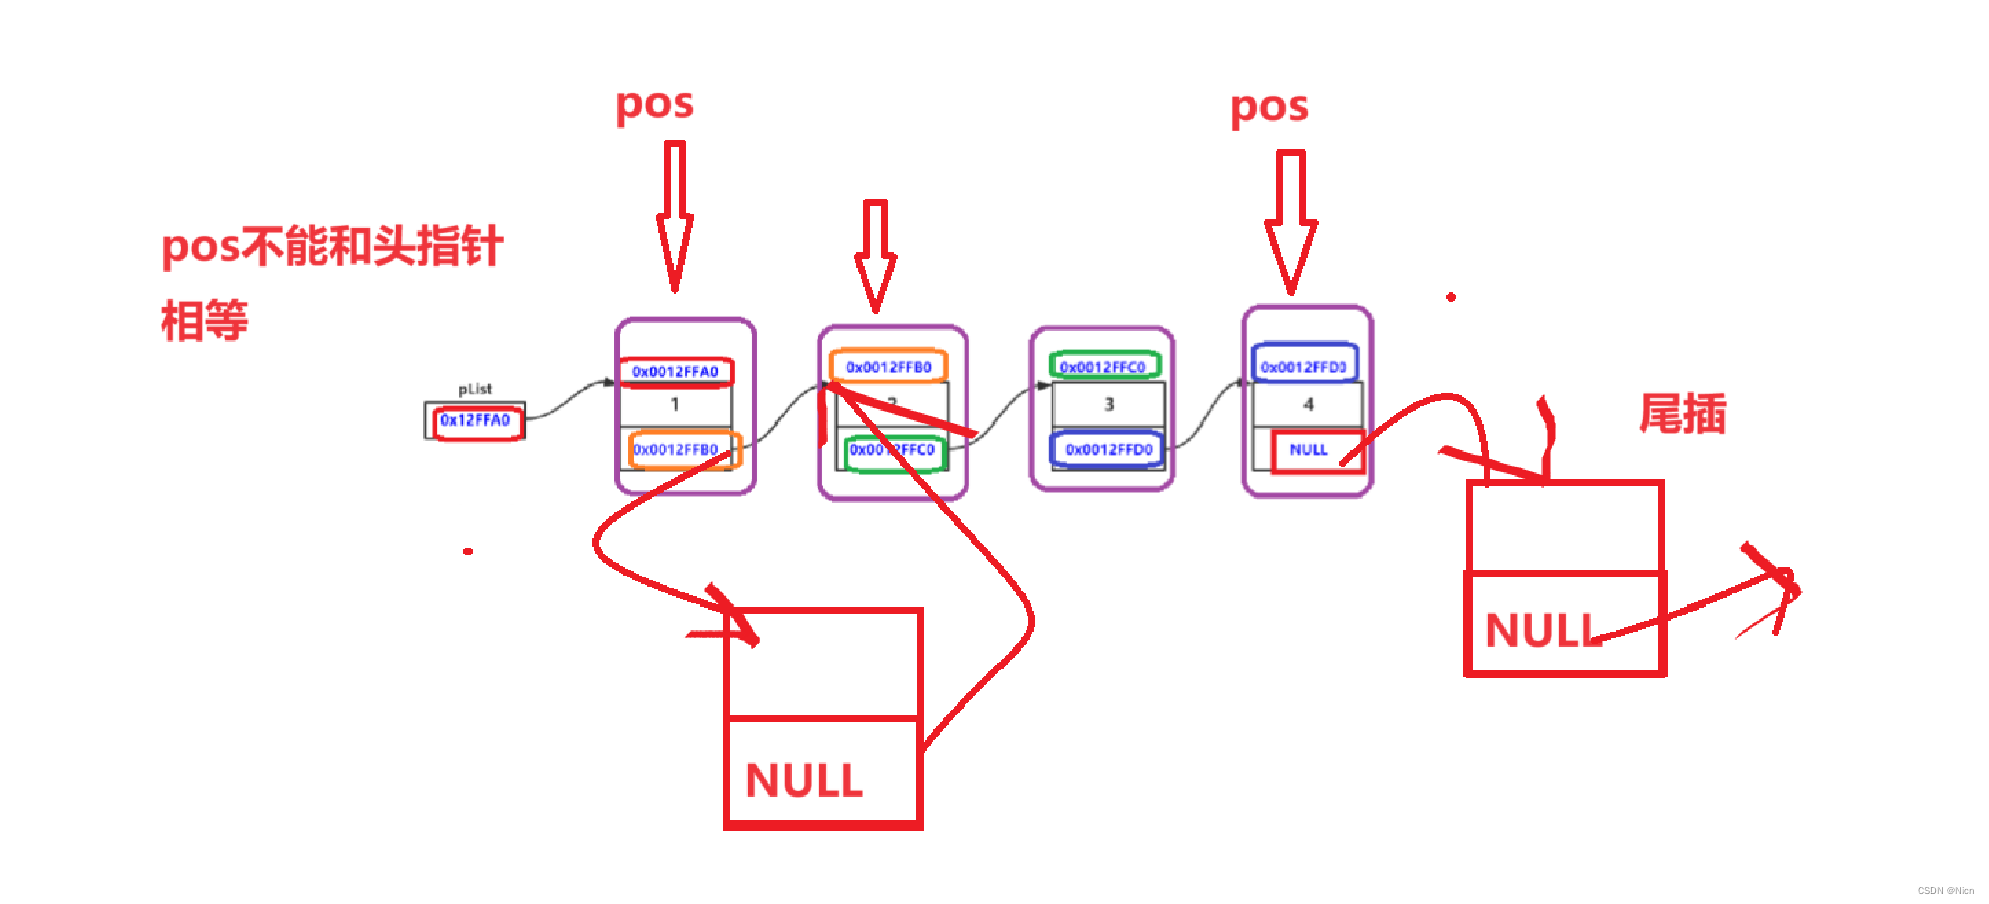
不是不能和头指针相等,是不能为空指针。不可能实现头插
void SLTInsertAfter(SLNode* pos, SLTDataType x)
{assert(pos);SLNode* newnode = BuySListNode(x);newnode->next = pos->next;pos->next = newnode;
}

3.11在pos位置前删除

3.12在pos位置后一个位置删除
void SLTEraseAfter(SLNode* pos)
{//不能传空指针、头指针、和指向尾节点的指针,没有意义assert(pos);assert(pos->next);SLNode* posNext = pos->next;pos->next = posNext->next;free(posNext);posNext = NULL;
}


3.13在pos位置删除
void SLTErase(SLNode** phead, SLNode* pos)
{assert(pos);//断言不会传入空指针if (pos == *phead){//头删SLTPopFront(phead);}else{SLNode* pre = *phead;while (pre->next != pos){pre - pre->next;}pre->next = pos->next;free(pos);pos = NULL;}
}


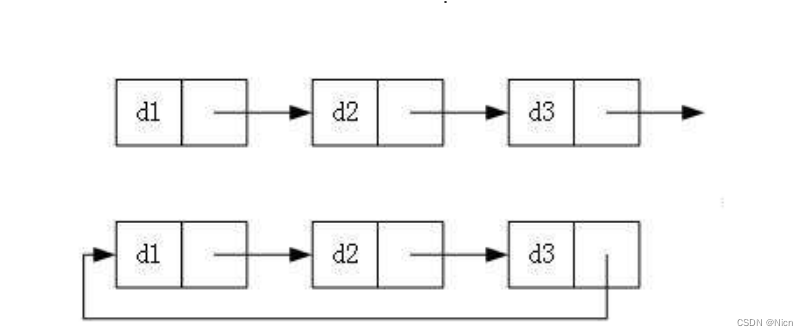
4.补充链表类型暂时了解
① 单向或者双向

②带头或者不带头
③循环或者非循环
5.结语
今天的重点在于理解单链表的增删查改,特别是什么时候需要传输二级指针,什么时候不传。以上就是本期的所有内容,知识含量蛮多,大家可以配合解释和原码运行理解。创作不易,大家如果觉得还可以的话,欢迎大家三连,有问题的地方欢迎大家指正,一起交流学习,一起成长,我是Nicn,正在c++方向前行的奋斗者,数据结构内容持续更新中,感谢大家的关注与喜欢。