北京建设工程质量总站网站怎样撰写企业网站建设方案

一、JNI简介
JVM本地方法接口(Java Native Interface,JNI)是一种允许Java代码调用本地方法(如C或C++编写的方法)的机制。这种技术通常用于实现高性能的计算密集型任务,或者与底层系统库进行交互。
二、JNI组成
-
Java类中的native方法:在Java类中使用native关键字声明一个本地方法,表示该方法将由本地代码实现。
-
JNI头文件:使用Java Native Interface工具(javac、javah)生成本地方法的头文件,该头文件中包含了本地方法的声明和参数列表等信息。
-
本地代码实现:根据生成的头文件,在本地代码中实现对应的本地方法。可以使用C、C++等语言编写本地代码,并通过编译器将其编译成动态链接库(DLL)或共享库(SO)。
三、JNI的作用
-
提高性能:通过将计算密集型任务交给本地代码实现,可以提高程序的性能。因为本地代码可以直接操作内存和硬件资源,而不需要经过Java虚拟机的额外开销。
-
与底层系统库交互:JNI可以方便地与底层系统库进行交互,例如访问操作系统、数据库、网络等资源。
-
扩展Java功能:通过JNI,可以将其他编程语言的功能集成到Java程序中,从而扩展Java的功能。
四、本地方法
简单来讲,一个Native Method就是一个Java调用非Java代码的接口。一个Native Method是这样一个java方法:该方法的实现由非Java语言实现,比如C。这个特征并非Java特有,很多其他的编程语言都有这一机制,比如在C++ 中,你可以用extern “C” 告知C++ 编译器去调用一个C的函数。
在定义一个native method时,并不提供实现体(有些像定义一个Java interface),因为其实现体是由非java语言在外面实现的。
本地接口的作用是融合不同的编程语言为Java所用,它的初衷是融合C/C++程序。
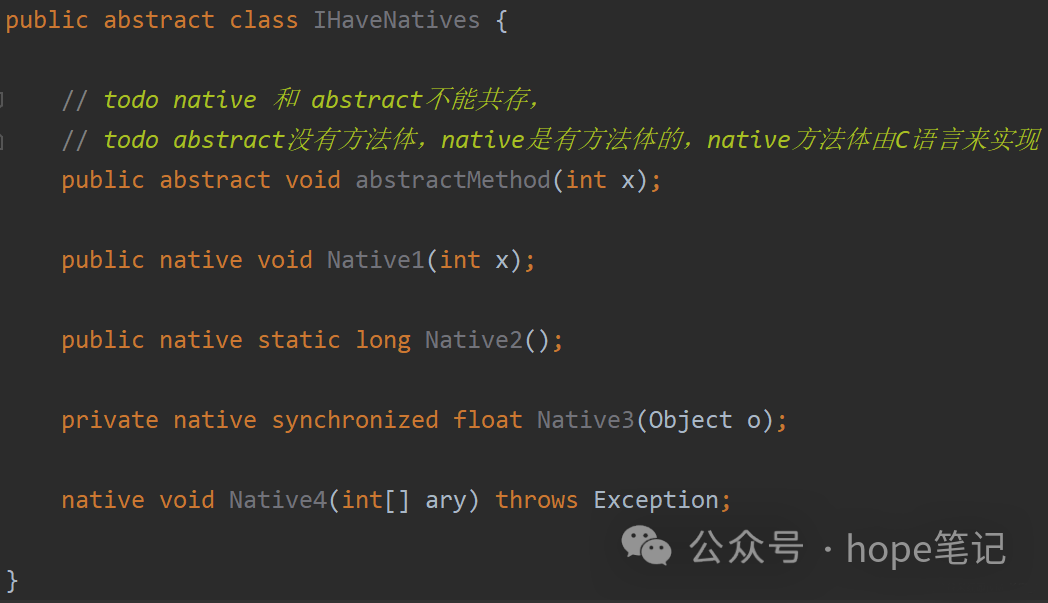
标识符native可以与所有其它的java标识符连用,但是abstract除外。这是合理的,因为native暗示这些方法是有实现体的,只不过这些实现体是非java的,但是abstract却显然的指明这些方法无实现体。native与其它java标识符连用时,其意义同非Native Method并无差别,比如native static表明这个方法可以在不产生类的实例时直接调用,这非常方便,比如当你想用一个native method去调用一个C的类库时。上面的第三个方法用到了native synchronized,JVM在进入这个方法的实现体之前会执行同步锁机制(就像java的多线程。)
一个native method方法可以返回任何java类型,包括非基本类型,而且同样可以进行异常控制。这些方法的实现体可以制一个异常并且将其抛出,这一点与java的方法非常相似。当一个native method接收到一些非基本类型时如Object或一个整型数组时,这个方法可以访问这非些基本型的内部,但是这将使这个native方法依赖于你所访问的java类的实现。有一点要牢牢记住:我们可以在一个native method的本地实现中访问所有的java特性,但是这要依赖于你所访问的java特性的实现,而且这样做远远不如在java语言中使用那些特性方便和容易。
native method的存在并不会对其他类调用这些本地方法产生任何影响,实际上调用这些方法的其他类甚至不知道它所调用的是一个本地方法。JVM将控制调用本地方法的所有细节。需要注意当我们将一个本地方法声明为final的情况。用java实现的方法体在被编译时可能会因为内联而产生效率上的提升。但是一个native final方法是否也能获得这样的好处却是值得怀疑的,但是这只是一个代码优化方面的问题,对功能实现没有影响。
如果一个含有本地方法的类被继承,子类会继承这个本地方法并且可以用java语言重写这个方法(这个似乎看起来有些奇怪),同样的如果一个本地方法被fianl标识,它被继承后不能被重写。
本地方法非常有用,因为它有效地扩充了jvm.事实上,我们所写的java代码已经用到了本地方法,在sun的java的并发(多线程)的机制实现中,许多与操作系统的接触点都用到了本地方法,这使得java程序能够超越java运行时的界限。有了本地方法,java程序可以做任何应用层次的任务。
五、使用native method
1. 与Java环境外交换
需要和Java外面的环境进行交互,这是本地方法存在的主要原因。比如和操作系统或者某些硬件交换信息时,本地方法就为我们提供了方便简洁的接口。
2. 与操作系统交互
通过使用本地方法,Java实现了JRE与底层系统的交互,甚至JVM的一部分就是使用 C 写的。另外如果我们要使用Java未提供的封装的操作系统的特性时,也需要使用到本地方法。就像Java创建的线程最终还是要回归到操作系统的本地线程。
3. Sun’s Java
Sun的解释器是用 C 实现的,使得它能像一些普通的 C 一样与外部交互。例如类 java.lang.Thread 的 setPriority() 方法是通过java 实现的,但是它实际调用的是该类里的本地方法 setPriority0()。
六、JNI源码解读
JNI源码解读主要包括以下几个部分:
-
JNI头文件:包含JNI函数声明和结构体定义。例如,jintArray、jbooleanArray等类型的声明。
-
JNI函数实现:这些函数是在C或C++中实现的,它们提供了与JNI头文件中声明的函数对应的本地方法。例如,GetStringUTFChars、ReleaseStringUTFChars等函数。
-
JNI函数指针:这些指针指向JNI函数实现。在Java代码中,可以使用这些指针来调用本地方法。
-
Java类和方法:这些类和方法用于在Java代码中声明本地方法。例如,public native void nativeMethod();表示一个本地方法。
-
加载和链接本地库:在Java程序启动时,需要加载包含本地方法实现的本地库。然后,JVM会将这些本地方法与Java类和方法关联起来。
以下是一个简单的JNI源码示例:
#include <jni.h>
#include "HelloJNI.h"
#include <stdio.h>JNIEXPORT jstring JNICALL Java_HelloJNI_sayHello(JNIEnv *env, jobject obj) {return (*env)->NewStringUTF(env, "Hello from C!");
}
在这个示例中,我们实现了一个名为sayHello的本地方法,它返回一个字符串"Hello from C!"。要使用这个本地方法,需要在Java代码中声明它:
public class HelloJNI {static {System.loadLibrary("hello-jni");}public native String sayHello();public static void main(String[] args) {HelloJNI hello = new HelloJNI();String result = hello.sayHello();System.out.println(result);}
}
编译并运行这个Java程序,将看到输出"Hello from C!"。
七、结语
目前该方法的使用越来越少了,除非是与硬件有关的应用,比如通过java程序驱动打印机或者java系统管理生产设备,在企业级应用已经比较少见。因为现在的异构领域间的通信很发达,比如可以使用Socket通信,也可以是用Web Service等等。
需要注意的是,由于本地方法可能会破坏Java的安全性和可移植性,因此在使用JNI时需要谨慎操作。此外,虚拟机保证在同一Java线程中多次调用同一本地方法时,传递给该本地方法的JNI接口指针是相同的。