电商网站开发 上海文化建设的名言警句
关于作者:CSDN内容合伙人、技术专家, 从零开始做日活千万级APP。
专注于分享各领域原创系列文章 ,擅长java后端、移动开发、商业变现、人工智能等,希望大家多多支持。
目录
- 一、导读
- 二、概览
- 三、权限分类
- 3.1 安装时权限
- 3.2 运行时权限
- 3.3 特殊权限
- 四、声明应用权限
- 4.1 将硬件声明为可选
- 4.2 确定硬件可用性
- 4.3 按 API 级别声明权限
- 五、请求应用权限
- 5.1 请求运行时权限
- 5.2 请求特殊权限
- 六、自定义权限
- 七、限制与其他应用的交互
- 八、 推荐阅读

一、导读
我们继续总结学习Android基础知识,温故知新。
本文将概要介绍 Android 权限的工作原理,包括使用权限的概要工作流、对不同类型权限的说明,以及在应用中使用权限的一些最佳实践等等。
二、概览
应用权限有助于保护对以下数据和操作的访问/执行权限,从而为保护用户隐私提供支持:
- 受限数据,例如系统状态和用户的联系信息
- 受限操作,例如连接到已配对的设备并录制音频
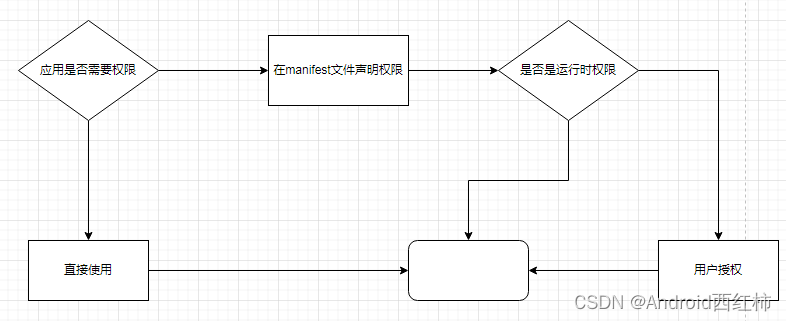
我们看下使用应用权限的工作流:
三、权限分类
Android 将权限分为不同的类型,包括安装时权限、运行时权限和特殊权限。每种权限类型都指明了当系统授予应用该权限后,应用可以访问的受限数据范围以及应用可以执行的受限操作范围。
总的权限是非常多的,具体的可以查看 权限列表 api
3.1 安装时权限
安装时权限授予应用对受限数据的受限访问权限,或允许应用执行对系统或其他应用只有最低影响的受限操作。
Android 提供多个安装时权限子类型,包括一般权限和签名权限。
3.2 运行时权限
运行时权限也称为危险权限,此类权限授予应用对受限数据的额外访问权限,或允许应用执行对系统和其他应用具有更严重影响的受限操作。
因此,您需要先在应用中请求运行时权限,然后才能访问受限数据或执行受限操作。
当应用请求运行时权限时,系统会显示运行时权限提示。
许多运行时权限会访问用户私人数据,这是一种特殊的受限数据,其中包括可能比较敏感的信息。例如,位置信息和联系信息就属于用户私人数据。
麦克风和摄像头可用于获取特别敏感的信息。因此,该系统会帮助您说明应用获取这类信息的原因。
系统会为运行时权限分配 dangerous 保护级别。
3.3 特殊权限
特殊权限与特定的应用操作相对应。只有平台和原始设备制造商 (OEM) 可以定义特殊权限
系统会为特殊权限分配 appop 保护级别
四、声明应用权限
如果您的应用要请求应用权限,您必须在应用的清单文件中声明这些权限。这些声明可帮助应用商店和用户了解您的应用可能会请求的权限组合。
请求权限的过程取决于权限类型:
- 如果是安装时权限(例如一般权限或签名权限),系统会在安装您的应用时自动为其授予相应权限。
- 如果是运行时权限或特殊权限,并且您的应用安装在搭载 Android 6.0(API 级别 23)或更高版本的设备上,则您必须自己请求运行时权限或特殊权限。
如需声明应用可能请求的权限,请在应用的清单文件中添加相应的 元素。例如,如果应用需要访问相机,则应在 AndroidManifest.xml 中添加以下代码行:
<manifest ...><uses-permission android:name="android.permission.CAMERA"/><application ...>...</application>
</manifest>
4.1 将硬件声明为可选
某些权限(例如 CAMERA)可让您的应用访问只有部分 Android 设备具备的硬件。如果您的应用声明了这类硬件相关权限,请考虑您的应用在没有该硬件的设备上是否仍可运行。
在大多数情况下,硬件是可选的,因此最好在 声明中将 android:required 设置为 false,从而将硬件声明为可选项,如 AndroidManifest.xml 中的以下代码段所示:
<manifest ...><application>...</application><uses-feature android:name="android.hardware.camera"android:required="false" />
<manifest>注意:如果您未在 <uses-feature> 声明中将 android:required 设置为 false,则 Android 会假定您的应用必须在有该硬件的情况下才能运行。因此,系统会阻止某些设备安装您的应用。
4.2 确定硬件可用性
如果您将硬件声明为可选,您的应用在没有该硬件的设备上也可以运行。如需检查设备是否具有特定的硬件,请使用 hasSystemFeature() 方法,
如以下代码段所示。如果设备不具有该硬件,只需在您的应用中停用此功能即可。
// Check whether your app is running on a device that has a front-facing camera.if (getApplicationContext().getPackageManager().hasSystemFeature(PackageManager.FEATURE_CAMERA_FRONT)) {// Continue with the part of your app's workflow that requires a// front-facing camera.} else {// Gracefully degrade your app experience.}
4.3 按 API 级别声明权限
如需仅针对支持运行时权限的设备(即搭载 Android 6.0 [API 级别 23] 或更高版本的设备)声明某项权限,请添加 (而非 )元素。
使用这两个元素中的任意一个时,您都可以设置 maxSdkVersion 属性,指明搭载的 Android 版本高于指定值的设备不需要特定权限。这样,您就可以消除不必要的权限,同时仍为旧款设备提供兼容性。
例如,您的应用可能会显示用户在使用您的应用时创建的媒体内容,例如照片或视频。在这种情况下,只要您的应用以 Android 10 或更高版本为目标平台,
您就无需在搭载 Android 10(API 级别 29)或更高版本的设备上使用 READ_EXTERNAL_STORAGE 权限。不过,为了与旧款设备兼容,您可以声明 READ_EXTERNAL_STORAGE 权限,
并将 android:maxSdkVersion 设置为 28。
五、请求应用权限
5.1 请求运行时权限
这一块相对来说也比较简单,我们可以调用系统的方法,也可以使用三方开源库来做。
if (ContextCompat.checkSelfPermission(CONTEXT, Manifest.permission.REQUESTED_PERMISSION) ==PackageManager.PERMISSION_GRANTED) {// You can use the API that requires the permission.performAction(...);
} else if (shouldShowRequestPermissionRationale(...)) {// In an educational UI, explain to the user why your app requires this// permission for a specific feature to behave as expected, and what// features are disabled if it's declined. In this UI, include a// "cancel" or "no thanks" button that lets the user continue// using your app without granting the permission.showInContextUI(...);
} else {// You can directly ask for the permission.requestPermissions(CONTEXT,new String[] { Manifest.permission.REQUESTED_PERMISSION },REQUEST_CODE);
}
开源的库比较多,我们不做深入描述,可自行学习
AndPermission
RxPermissions
PermissionsDispatcher
easypermissions
XXPermissions
等等
5.2 请求特殊权限
特殊权限旨在限制访问尤其敏感或与用户隐私没有直接关系的系统资源
一些特殊权限示例:
- 设定精确的闹钟。
- 在其他应用前方显示和绘图。
- 访问所有存储数据。
声明特殊权限的应用会显示在系统设置中的特殊应用权限页面内。如需向应用授予特殊权限,用户必须转到此页面:设置 > 应用 > 特殊应用权限。
与运行时权限不同,用户必须从系统设置中的特殊应用权限页面授予特殊权限。应用可以使用 intent 将用户转到该页面,这会暂停应用,并启动相应的设置页面,
以便用户授予指定的特殊权限。用户返回到应用后,应用可以在 onResume() 函数中检查是否已获得相应权限。
以下示例代码展示了如何请求用户授予 SCHEDULE_EXACT_ALARMS 特殊权限:
val alarmManager = getSystemService<AlarmManager>()!!
when {// if permission is granted, proceed with scheduling exact alarms…alarmManager.canScheduleExactAlarms() -> {alarmManager.setExact(...)}else -> {// ask users to grant the permission in the corresponding settings pagestartActivity(Intent(ACTION_REQUEST_SCHEDULE_EXACT_ALARM))}
}
六、自定义权限
通过定义自定义权限,应用可以与其他应用共享其资源和功能。
Android 是一种权限分离的操作系统,其中每个应用都以不同的系统身份(Linux 用户 ID 和组 ID)运行。系统的各个部分也会被分隔为不同的身份。因此,Linux 可以将应用同其他应用和系统隔离开来。
应用可以定义其他应用可请求的权限,从而将自己的功能提供给后者。它们还可以定义能够自动提供给已使用同一证书进行签名的任何其他应用的权限。
可以在每个软件包的 AndroidManifest.xml 的 清单标记中使用 sharedUserId 属性分配相同的用户 ID。这样做以后,出于安全考虑,系统随后会将这两个软件包视为具有相同用户 ID 和文件权限的同一应用。
请注意,为了确保安全性,只有具有相同签名(以及请求了相同 sharedUserId)的两个应用才能够获得相同的用户 ID。
如需强制执行自己的权限,您首先必须使用一个或多个 元素在您的 AndroidManifest.xml 中声明它们语法:
<permission android:description="string resource" 权限的用户可读说明,此属性应设置为对字符串资源的引用。与 label 属性不同,它不能是原始字符串。android:icon="drawable resource" 对表示权限的图标的可绘制资源的引用。android:label="string resource" 权限的用户可读名称。android:name="string" 用于在代码中(例如,在 <uses-permission> 元素或应用组件的 permission 属性中)引用权限的名称。android:permissionGroup="string" 将此权限分配给一个组。此属性的值是该组的名称,使用此应用或其他应用中的 <permission-group> 元素声明。如果未设置此属性,则此权限不会属于某个组。android:protectionLevel=["normal" | "dangerous" | 说明权限中隐含的潜在风险,并指示系统在确定是否将权限授予请求授权的应用时要遵循的流程。"signature" | ...] />
例如
<manifestxmlns:android="http://schemas.android.com/apk/res/android"package="com.example.myapp" ><permissionandroid:name="com.example.myapp.permission.DEADLY_ACTIVITY"android:label="@string/permlab_deadlyActivity"android:description="@string/permdesc_deadlyActivity"android:permissionGroup="android.permission-group.COST_MONEY"android:protectionLevel="dangerous" />...
</manifest>
注意:系统不允许多个软件包声明同名权限,除非所有软件包均使用同一证书进行签名。
如果软件包声明了某个权限,系统不会允许用户安装其他具有相同权限名称的软件包,除非这些软件包使用与第一个软件包相同的证书进行签名。
因此,Google 建议为权限添加应用软件包名称作为前缀,并使用反向域名方式命名。在此前缀后面加上 .permission.,接着是权限所代表的功能的说明,
以 SNAKE_CASE 的大写格式书写。例如 com.example.myapp.permission.ENGAGE_HYPERSPACE。
遵循此建议可以避免命名冲突,并有助于清晰地标识自定义权限的所有者和意图。
每个保护级别都包含基本权限类型以及零个或多个标志。例如,“dangerous” 保护级别没有标志。相反,保护级别 “signature|privileged” 是 “signature” 基本权限类型和 “privileged” 标志的组合。
| 值 | 含义 |
|---|---|
| “normal” | 默认值。具有较低风险的权限,此类权限允许请求授权的应用访问隔离的应用级功能,对其他应用、系统或用户的风险非常小。系统会自动向在安装时请求授权的应用授予此类权限,无需征得用户的明确许可(但用户始终可以选择在安装之前查看这些权限)。 |
| “dangerous” | 具有较高风险的权限,此类权限允许请求授权的应用访问用户私人数据或获取可对用户造成不利影响的设备控制权。由于此类权限会带来潜在风险,因此系统可能不会自动向请求授权的应用授予此类权限。例如,应用请求的任何危险权限都可能会向用户显示并且获得确认才会继续执行操作,或者系统会采取一些其他方法来避免用户自动授予使用此类功能的权限。 |
| “signature” | 只有在请求授权的应用使用与声明权限的应用相同的证书进行签名时系统才会授予的权限。如果证书匹配,系统会在不通知用户或征得用户明确许可的情况下自动授予权限。 |
| “knownSigner” | 只有在请求授权的应用使用允许使用的证书进行签名时系统才会授予的权限。如果请求者的证书已列出,系统会在不通知用户或征得用户明确许可的情况下自动授予权限。 |
| “signatureOrSystem” | “signature、privileged” 的旧同义词。在 API 级别 23 中已废弃。系统仅向位于 Android 系统映像的专用文件夹中的应用或使用与声明权限的应用相同的证书进行签名的应用授予的权限。不要使用此选项,因为 “signature” 保护级别足以满足大多数需求,无论应用安装在何处,该保护级别都能正常发挥作用。 |
| “signatureOrSystem” | 权限适用于以下特殊情况:多个供应商将应用内置到一个系统映像中,并且需要明确共享特定功能,因为这些功能是一起构建的。 |
七、限制与其他应用的交互
权限不仅仅用于请求获取系统功能的使用权。您还可以限制其他应用与您的应用组件互动的方式。
我们可以配置 activity、服务、content provider 和广播接收器来限制其他应用与您的应用互动的方式
- 对清单中的 标记使用 android:permission 属性,以限制哪些其他应用可以启动该 Activity。系统会在 Context.startActivity() 和 Activity.startActivityForResult() 期间检查该权限。如果调用方没有所需的权限,将会发生 SecurityException。
- 对清单中的 标记使用 android:permission 属性
- 对 标记使用 android:permission 属性
- 对 标记使用 android:permission 属性,以限制哪些其他应用可以向关联的 BroadcastReceiver 发送广播
权限
八、 推荐阅读
Java 专栏
SQL 专栏
数据结构与算法
Android学习专栏