娄底网站建设报价建立门户公司网站
目录
- 一、消费者(手动提交 offset)的概述
- 1.1、手动提交offset的两种方式
- 1.2、手动提交offset两种方式的区别
- 1.3、手动提交offset的图解
- 二、消费者(手动提交 offset)的代码示例
- 2.1、手动提交 offset(采用同步提交的方式)代码
- 2.1、手动提交 offset(采用异步提交的方式)代码
一、消费者(手动提交 offset)的概述
1.1、手动提交offset的两种方式
- commitSync(同步提交):必须等待offset提交完毕,再去消费下一批数据。
- commitAsync(异步提交) :发送完提交offset请求后,就开始消费下一批数据了。
1.2、手动提交offset两种方式的区别
- 相同点:都会将本次提交的一批数据最高的偏移量提交。
- 不同点是:同步提交阻塞当前线程,一直到提交成功,并且会自动失败重试(由不可控因素导致,也会出现提交失败);而异步提交则没有失败重试机制,故有可能提交失败。
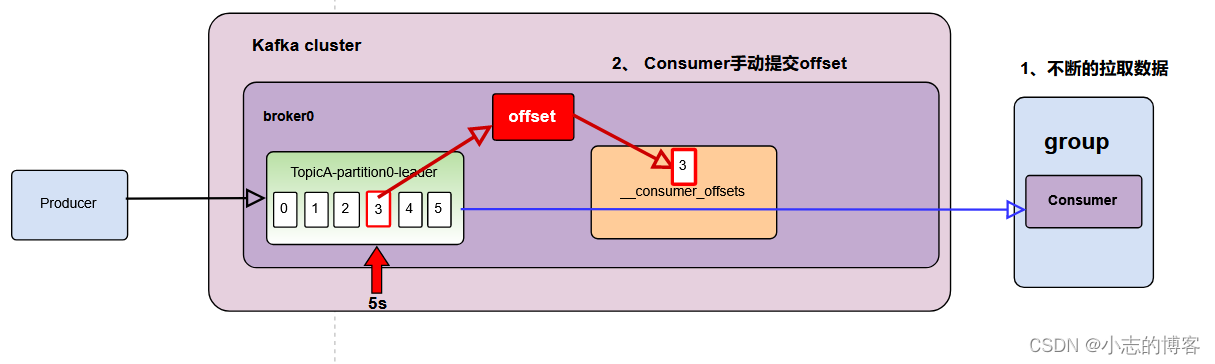
1.3、手动提交offset的图解
二、消费者(手动提交 offset)的代码示例
2.1、手动提交 offset(采用同步提交的方式)代码
-
同步提交代码
由于同步提交 offset 有失败重试机制,故更加可靠,但是由于一直等待提交结果,提交的效率比较低。// 是否自动提交 offset properties.put(ConsumerConfig.ENABLE_AUTO_COMMIT_CONFIG,false); // 手动提交offset(同步提交) kafkaConsumer.commitSync(); -
同步提交完整代码
package com.xz.kafka.consumer;import org.apache.kafka.clients.consumer.ConsumerConfig;
import org.apache.kafka.clients.consumer.ConsumerRecord;
import org.apache.kafka.clients.consumer.ConsumerRecords;
import org.apache.kafka.clients.consumer.KafkaConsumer;
import org.apache.kafka.common.serialization.StringDeserializer;import java.time.Duration;
import java.util.ArrayList;
import java.util.Properties;public class CustomConsumerByHandSync {public static void main(String[] args) {// 配置Properties properties = new Properties();// 连接 bootstrap.serversproperties.put(ConsumerConfig.BOOTSTRAP_SERVERS_CONFIG,"192.168.136.27:9092,192.168.136.28:9092,192.168.136.29:9092");// 反序列化properties.put(ConsumerConfig.KEY_DESERIALIZER_CLASS_CONFIG, StringDeserializer.class.getName());properties.put(ConsumerConfig.VALUE_DESERIALIZER_CLASS_CONFIG, StringDeserializer.class.getName());// 配置消费者组idproperties.put(ConsumerConfig.GROUP_ID_CONFIG,"test3");// 手动提交properties.put(ConsumerConfig.ENABLE_AUTO_COMMIT_CONFIG,false);// 1 创建一个消费者  "", "hello"KafkaConsumer<String, String> kafkaConsumer = new KafkaConsumer<>(properties);// 2 订阅主题 sevenTopicArrayList<String> topics = new ArrayList<>();topics.add("sevenTopic");kafkaConsumer.subscribe(topics);// 3 消费数据while (true){ConsumerRecords<String, String> consumerRecords = kafkaConsumer.poll(Duration.ofSeconds(1));for (ConsumerRecord<String, String> consumerRecord : consumerRecords) {System.out.println(consumerRecord);}// 手动提交offset(同步提交)kafkaConsumer.commitSync();}}
}
2.1、手动提交 offset(采用异步提交的方式)代码
-
异步提交代码
虽然同步提交 offset 更可靠一些,但是由于其会阻塞当前线程,直到提交成功。因此吞吐量会受到很大的影响。因此更多的情况下,会选用异步提交 offset的方式。// 是否自动提交 offset properties.put(ConsumerConfig.ENABLE_AUTO_COMMIT_CONFIG,false); // 手动提交offset(异步提交) kafkaConsumer.commitAsync(); -
异步提交完整代码
package com.xz.kafka.consumer;import org.apache.kafka.clients.consumer.ConsumerConfig;
import org.apache.kafka.clients.consumer.ConsumerRecord;
import org.apache.kafka.clients.consumer.ConsumerRecords;
import org.apache.kafka.clients.consumer.KafkaConsumer;
import org.apache.kafka.common.serialization.StringDeserializer;import java.time.Duration;
import java.util.ArrayList;
import java.util.Properties;public class CustomConsumerByHandSync {public static void main(String[] args) {// 0 配置Properties properties = new Properties();// 连接 bootstrap.serversproperties.put(ConsumerConfig.BOOTSTRAP_SERVERS_CONFIG,"192.168.136.27:9092,192.168.136.28:9092,192.168.136.29:9092");// 反序列化properties.put(ConsumerConfig.KEY_DESERIALIZER_CLASS_CONFIG, StringDeserializer.class.getName());properties.put(ConsumerConfig.VALUE_DESERIALIZER_CLASS_CONFIG, StringDeserializer.class.getName());// 配置消费者组idproperties.put(ConsumerConfig.GROUP_ID_CONFIG,"test3");// 手动提交properties.put(ConsumerConfig.ENABLE_AUTO_COMMIT_CONFIG,false);// 1 创建一个消费者  "", "hello"KafkaConsumer<String, String> kafkaConsumer = new KafkaConsumer<>(properties);// 2 订阅主题 sevenTopicArrayList<String> topics = new ArrayList<>();topics.add("sevenTopic");kafkaConsumer.subscribe(topics);// 3 消费数据while (true){ConsumerRecords<String, String> consumerRecords = kafkaConsumer.poll(Duration.ofSeconds(1));for (ConsumerRecord<String, String> consumerRecord : consumerRecords) {System.out.println(consumerRecord);}// 手动提交offset(异步提交)kafkaConsumer.commitAsync();}}
}