关于给予网站建设的请求网站备案密码丢了怎么办
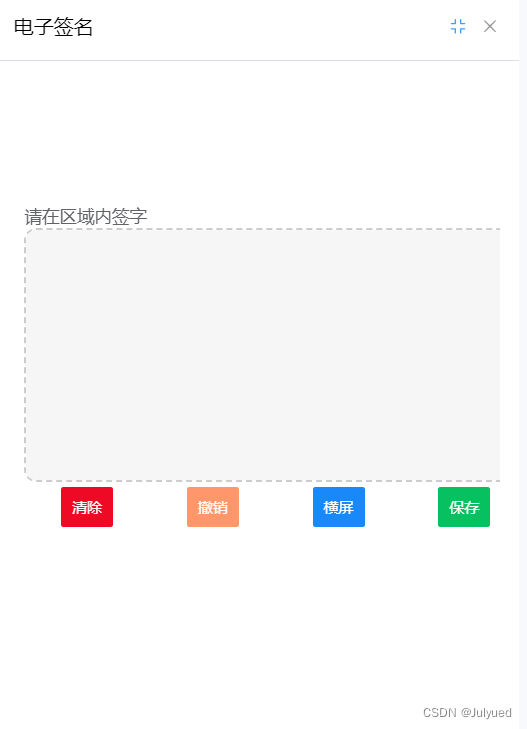
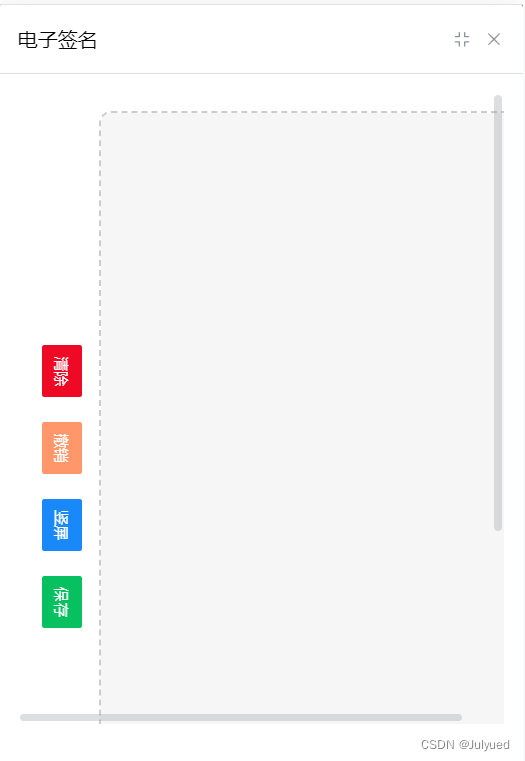
实现效果:(左边横屏,右边竖屏)
前言:【使用开源项目smooth-signature 实现签名的功能。Gitee 地址是 :GitHub - linjc/smooth-signature: H5带笔锋手写签名,支持PC端和移动端,任何前端框架均可使用
以下代码可复制粘贴直接用,改下文件路径即可】
1.在项目中安装依赖包:npm install --save smooth-signature
2.我是放到一个dialog里,可根据需求自行开发。
弹框代码:
<!--签名--><Dialogv-model="signatureVisible"title="电子签名"width="100%"destroy-on-closedraggable:append-to-body="true"@close="handleClose"><div v-loading="endLoading"><ESign @closeson="closeVisi" /></div><button v-show="false" @click="closeVisi">关闭</button></Dialog>引入模块:
import ESign from '@/views/officeDocument/office/components/packages/ESign/src/index2.vue'使用方法:
//电子签名
const signatureVisible = ref(false)
const signatureBtn = () => {signatureVisible.value = true
}
//子组件关闭调用此方法
const closeVisi = () => {signatureVisible.value = false
}
2.开发电子签名功能及样式
电子签名文件目录(src/index.vue省略,主要是index2.vue文件):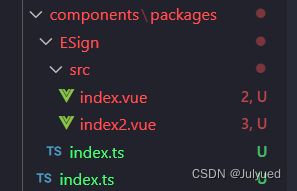
packages/index.ts文件代码:
import { App, Plugin } from 'vue'import { ESignPlugin } from './ESign'
const XiPlugin: Plugin = {install(app: App) {ESignPlugin.install?.(app)}
}export default XiPluginexport * from './ESign'
packages/Esign/index.ts文件代码:
import { App, Plugin } from 'vue'
import ESign from './src/index.vue'export const ESignPlugin: Plugin = {install(app: App) {app.component('ESign', ESign)}
}export { ESign }
packages/Edign/src/index2.vue文件代码(主要代码):
<template><div class="sign-finish"><div class="wrap1" v-show="showFull"><span class="sign-title">请在区域内签字</span><canvas class="canvas1" ref="canvas1"></canvas><div class="actions"><button class="danger" @click="handleClear1">清除</button><button class="warning" @click="handleUndo1">撤销</button><button class="primary" @click="handleFull">横屏</button><button class="success" @click="handlePreview1">保存</button></div></div><div class="wrap2" v-show="!showFull"><div class="actionsWrap"><div class="actions"><button class="danger" @click="handleClear2">清除</button><button class="warning" @click="handleUndo2">撤销</button><button class="primary" @click="handleFull">竖屏</button><button class="success" @click="handlePreview2">保存</button></div></div><canvas class="canvas" ref="canvas2"></canvas></div></div>
</template><script lang="ts" setup>
import { emit } from 'process'
import { ref, watch, onMounted, onUnmounted } from 'vue'
import SmoothSignature from 'smooth-signature'//组件电子签名
const canvas = document.querySelector('canvas')
// const signature = new SmoothSignature(canvas)
const showFull = ref(true)
const canvas2 = ref<any>(null)
const canvas1 = ref<any>(null)
const signature1 = ref<any>(null)
const signature2 = ref<any>(null)
const emit = defineEmits(['closeson'])//坚屏横屏
const handleFull = () => {showFull.value = !showFull.value
}
const initSignature1 = () => {// const canvas = this.$refs["canvas1"]const canvas = canvas1.value as anyconst options = {width: window.innerWidth - 30,height: 200,minWidth: 2,maxWidth: 6,openSmooth: true,// color: "#1890ff",bgColor: '#f6f6f6'}signature1.value = new SmoothSignature(canvas, options)
}
const initSignture2 = () => {// const canvas = this.$refs["canvas2"]const canvas = canvas2.value as anyconst options = {width: window.innerWidth - 120,height: window.innerHeight - 80,minWidth: 3,maxWidth: 10,openSmooth: true,// color: "#1890ff",bgColor: '#f6f6f6'}signature2.value = new SmoothSignature(canvas, options)
}const handleClear1 = () => {const sgn = signature1.valuesgn.clear()
}
const handleClear2 = () => {const sgn2 = signature2.valuesgn2.clear()
}
const handleUndo1 = () => {const sgn = signature1.valuesgn.undo()
}
const handleUndo2 = () => {const sgn2 = signature2.valuesgn2.undo()
}
const handlePreview1 = () => {const sgn = signature1.valueconst isEmpty = sgn.isEmpty()if (isEmpty) {alert('isEmpty')return}// const pngUrl = sgn.getPNG()const pngUrl = sgn.getJPG()console.log(pngUrl)emit('closeson')// window.previewImage(pngUrl);
}
const handlePreview2 = () => {const sgn2 = signature2.valueconst isEmpty = sgn2.isEmpty()if (isEmpty) {alert('isEmpty')return}const canvas = sgn2.getRotateCanvas(-90)const pngUrl = canvas.toDataURL()console.log('pngUrl', pngUrl)// 生成JPG//signature.getJPG() // 或者 signature.toDataURL('image/jpeg')
}onMounted(() => {initSignature1()initSignture2()
})// onUnmounted(() => {
//   removeEventListener()
// })
</script><style scoped lang="less">
.sign-finish {height: 100vh;width: 100vw;button {height: 32px;padding: 0 8px;font-size: 12px;border-radius: 2px;}.danger {color: #fff;background: #ee0a24;border: 1px solid #ee0a24;}.warning {color: #fff;background: #ff976a;border: 1px solid #ff976a;}.primary {color: #fff;background: #1989fa;border: 1px solid #1989fa;}.success {color: #fff;background: #07c160;border: 1px solid #07c160;}canvas {border-radius: 10px;border: 2px dashed #ccc;}.wrap1 {height: 100%;width: 96%;margin: auto;margin-top: 100px;.actions {display: flex;justify-content: space-around;}}.wrap2 {padding: 15px;height: 100%;display: flex;justify-content: center;.actionsWrap {width: 50px;display: flex;justify-content: center;align-items: center;}.canvas {flex: 1;}.actions {margin-right: 10px;white-space: nowrap;transform: rotate(90deg);button {margin-right: 20px;}}}
}
</style>
最后就实现啦!本人因项目 使用比较复杂,可根据个人情况减少代码。参考前面的开源项目地址即可。