网站 服务器 域名蛋糕店网站建设
一、引言
合成孔径成像自20世纪50年代提出,应用于雷达成像,历经70年的研发,已经日趋成熟,成功地用于环境资源监测、灾害监测、海事管理及军事等领域。受物理环境制约,合成孔径在声呐成像中的研发与应用起步稍迟,滞后于雷达,近年来在民用及军事领域的研究与应用进展加速。此外,近年来合成孔径成像在声学无损检测、医学超声成像等领域的研发也有长足进步,并扩展到其他领域如光学、微波成像等。本文简要介绍了条带合成孔径成像的原理及其在雷达、声呐、无损检测及医学影像等方面的应用及发展。
二、合成孔径成像原理
条带合成孔径成像利用小孔径基阵,在直线运动轨迹上均速移动,并在确定位置顺序发射,接收并存储回波信号。根据空间位置和相位关系对不同位置的回波信号进行相干叠加处理,合成虚拟大孔径的基阵,从而获得沿运动方向的高分辨率。
在1985年的先驱奖故事中,合成孔径雷达(SAR)的发明者Wiley谦逊地说:我有幸想到了一个基本想法,我称之为多普勒波束锐化(DBS),而不是合成孔径雷达。和所有信号处理一样,有一个双重理论:一个是频域解释,这是多普勒分析;在时域内分析系统,这就是合成孔径雷达。在时间域对合成孔径成像的“合成阵列”的解释如图1所示。
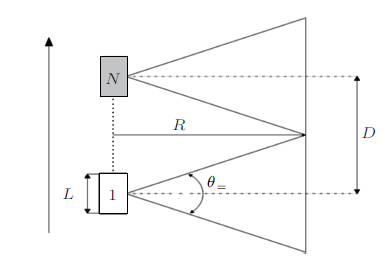
图1 合成阵列原理
其中,阵元或天线水平长度为L,水平波束开角为θ==λ/L。工作频率时,波长为λ。阵元行进轨迹为直线,点目标与行进轨迹的垂直距离为R。阵元在位置1时,目标进入波束;阵元在位置N时,目标退出波束。合成孔径阵元数为N,合成孔径长为D=R×θ==R×λ/ L,合成孔径波束开角为θsyn=λ/D=λ/(R×(λ/L))=L/R。
采样结束,合成孔径波束形成后处理时,对不同位置的回波信号进行相干叠加,需要计算阵元发射信号至目标、目标反射信号返回阵元的往返声程2R。因此,合成孔径波束开角实际应为θsyn=λ/2D=λ/(2R×(λ/L)) =L/2R。距直线轨迹垂直距离为R时,合成孔径波束形成的线分辨率为δsyn=R×θsyn=R×L/2R=L/2。
20世纪50年代在雷达成像中提出“合成孔径”原理时,称为“多普勒波束锐化”。这时在频率域对合成孔径成像的解释如图2所示。
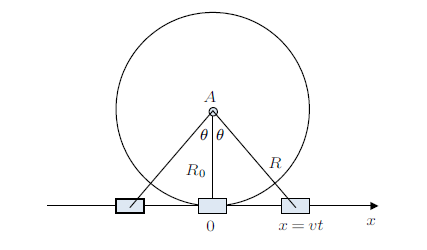
图2 多普勒频移原理
实孔径为D的雷达天线或声呐换能器阵元沿x轴自左至右匀速运行,发射并接收位于A的点目标的回波信号。阵元速度为v,在x轴上位置为x=vt。
回波信号的多普勒频移为
fd=2v/λ×sinθ≈2v/λtanθ=2v/(R0λ)x=2v2/(R0λ)t ⑴
多普勒频移变化率μ=dfd/dt=2v2/ R0λ,点目标进入并退出波束的持续时间为T=(R0λ/Dv)×c,回波信号的多普勒带宽为Bd=Tμ=2v/D。
因此,合成孔径线分辨率为
δsa=v/Bd=D/2 ⑵
极限情况:θmax=π/2,fmax=2v/λ,Bmax=4v/λ。
合成孔径极限分辨率为
δmax=v/Bd=λ/4 ⑶
三、合成孔径雷达的发展
1951年,美国Goodyear公司的Wiley首先提出用频率分析方法改善雷达角分辨率,此概念最先应用在射电天文学及雷达成像。
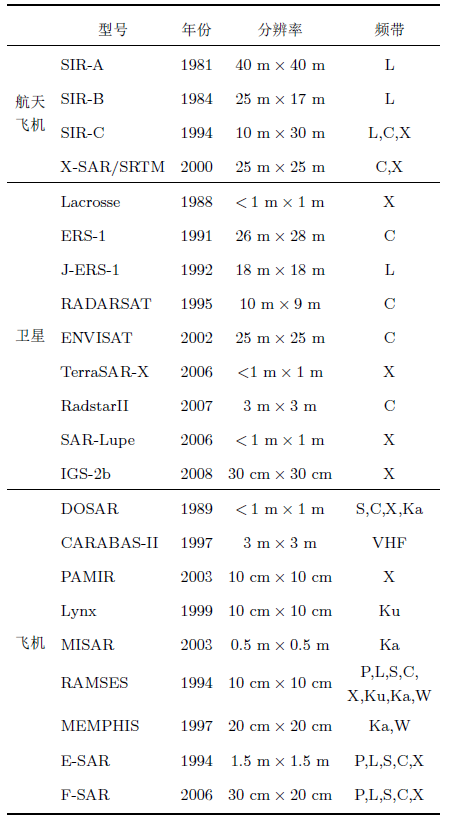
数个月后,美国伊利诺依大学及密歇根大学的研究人员独立研发了SAR。密歇根大学的研究人员于1957年给出了最早的合成孔径图像。但是,由于图像质量及分辨率都不高,当时几乎取消了SAR的研究计划。当时的分辨率指标是约16m,现在已经进入了SAR的兴盛时期。表1给出了系统常用频率及波长范围,表2列出一些星载及机载SAR成像雷达的参数。
表1 SAR系统常用频率及波长范围
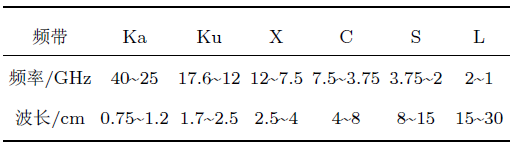
注:L、C及X是最常用的频带。P及L频带用于叶簇穿透、地表下成像以及生物量估计;C、S及X频带用于海洋、冰层及沉陷监测;X及Ku频带用于积雪监测;X及Ka用于高分辨率成像。
表2 一些星载及机载SAR成像雷达的参数
四、合成孔径(侧扫)声呐的发展
海洋占据地球表面约70%的面积,是人类开展交通运输、军事斗争和获取资源的场所。这就必须有在海洋中观测、通讯、导航、定位的工具。在海洋中可检测很多物理场,如:磁场、水压场、尾流场、温度场等。这此物理场的可检测距离大致与源本身尺度同一量级,不能在水中远距离传递信息。而水声技术在其中扮演了重要的角色。声波是迄今为止在水中唯一能有效地远距离传递信息的物理场。声波与电磁波的衰减之比如下:10kHz声波在水中衰减仅约1dB/km,10kHz电磁波在水中衰减高达3000dB/km。
实孔径侧扫声呐(SSS)多为拖曳方式工作,如图3所示。
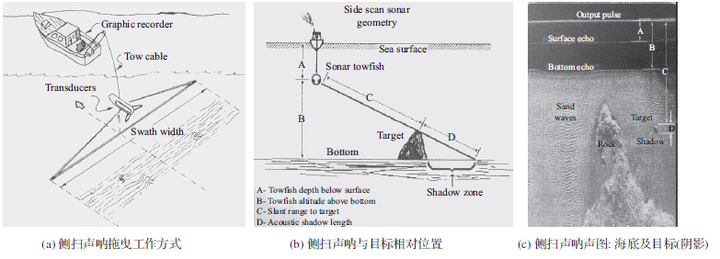
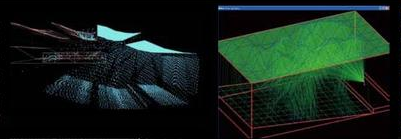
图3 侧扫声呐拖曳工作方式及声图
最早的侧扫声呐实验是Hagemann(1958)为美国海军完成的,直到1980年才解密发表。基于Hagemann的工作,西屋公司(Westinghouse)在20世纪60年代初建造了第一台实用的侧扫声呐。很快,侧扫声呐就成为海底调查、海底成像方面的重要工具,揭示了海底上很多以往不为人知的细节。商用侧扫声呐系统最早用于海洋水下考古,特别是寻找沉船。
与实孔径侧视雷达相似,实孔径侧扫声呐沿运动方向有恒定的波束开角,由声呐换能器的实际孔径确定,侧扫声呐水平波束及声图见图4。

图4 侧扫声呐水平波束及声图
实孔径侧扫声呐技术特性可归纳为水平波束恒定角分辨率,它与对波长归一化的阵长成反比,θ==λ/L。其中,阵元或天线水平长度为L;工作频率时,波长为λ。距离增加时,水平线分辨率降低,δ==R×θ==R×(λ/L)。
合成孔径(侧扫)声呐(SAS)与合成孔径侧视雷达类似:利用小孔径水声换能器,在直线运动轨迹上均速移动,并在确定位置顺序发射,接收并存储回波信号。根据空间位置和相位关系对不同位置的回波信号进行相干叠加处理,合成虚拟大孔径的基阵,从而获得沿运动方向的高分辨率。与合成孔径侧视雷达相同,合成孔径(侧扫)声呐沿运动方向的水平线分辨率为θsyn=L/2,其中,L为基阵长度。该水平线分辨率与频率无关,可采用低频工作;且与距离无关。
雷达应用电磁波,在空气中的传播速度约为300000km/s;声呐应用声波,在水中的传播速度仅为c=1.5km/s。工作距离为R、达到运动速度v时,多接收子阵合成孔径声呐基阵的物理长度最小为L=4vR/c,每一接收子阵的水平宽度为方位向分辨率的两倍。与实孔径声呐比较,种种这些因素使得合成孔径声呐的基阵体积大、质量大,系统复杂程度高。
在复杂多变的海洋环境中,拖体不可能严格地沿直线航迹匀速运动,运动误差如图5所示。
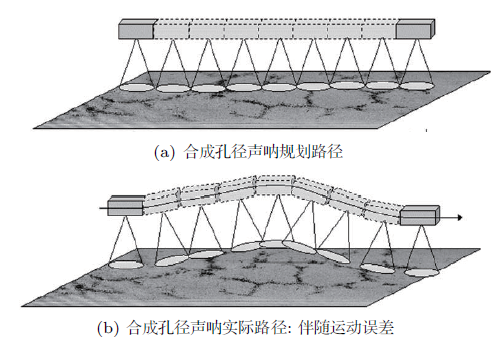
图5 合成孔径(侧扫) 声呐运动误差
合成孔径成像要求运动误差<±(λ/8~λ/4),λ100kHz≈15mm,λ10kHz≈150mm。对运动误差的要求更增加了合成孔径(侧扫)声呐的系统复杂性。
早在20世纪70年代中期,合成孔径技术就已经尝试用于侧扫声呐。在1975年,Cutrona提出了合成孔径声呐的一种设计程序,建议采用多波束系统,以提高拖曳方向采样率。大约在同时期,Williams进行了合成孔径声呐拖曳试验。
受应用环境物理参数制约,合成孔径声呐的研发与应用滞后雷达多年。应用需求不迫切,也延缓了合成孔径声呐的研发。一份报告指出:早期水雷对抗的目的是检测,识别大型号、几何形状简单的水雷,如2m长的圆柱体目标。在当时的态势下,水雷对抗舰艇上装备的声呐设备在大多情况已满足需求。因而,相对复杂的SAS系统并未受到充分关注。
当水雷对抗的战略战术重点转移至较浅的近沿海水域,对抗目标物为较小型号、更为隐蔽的水雷及机动武器时,新的需求要求声呐分辨率大幅提高。水下无人航行器(UUV)或自治水下航行器(AUV)的研发及日益拓展的应用,为合成孔径声呐提供了比水面船只拖曳的拖体更为稳定、可靠的载体,也促进了合成孔径声呐系统的性能改进及广泛应用。
⒈NURC浅水合成孔径声呐
北约海底研究中心(NURC)是北大西洋公约组织(NATO)下属的三个研究与技术机构之一,负责NATO的海上研发,支持NATO的海上作业需求。
NURC在1998年启动了水雷对抗合成孔径声呐的研发项目,于2002年按NURC的高水平合成孔径声呐系统技术指标进行了国际招标。2003年1月,Thales公司中标,按NURC设计指标研制SAS系统;Bluefin公司提供AUV,IXSEA公司提供惯导系统。2006年6月,在马里纳迪卡拉拉(Marinadi Carrara)区域完成了水上实验。NURC完成的浅水SAS的载体是Bluefin-21,直径0.53m,长3.5m,由Bluefin公司批量生产,供应市场;该SAS的工作频率为270kHz~330kHz;由36个主接收阵元组成,总长1.2m;沿运动方向的水平分辨率为1.6cm;运动补偿方案为罗经稳定DPC(G-DPC)导航系统。
⒉CSSRELIANT/SAS21系统
沿海系统站(CoastalSystemsStation,CSS)位于美国佛罗里达州巴拿马市圣安德鲁湾,是美国海军的一个重要实验室。其任务为水雷战、两栖战、海上特种战、潜水及生命支持的研究、开发、测试及评估,还包括沿海军事行动及其他受到特别关注的先进对抗策略研究。
CSS在2003年的报告中指出:合成孔径声呐、水下自治潜器是水下研究与开发中最具有挑战性的两个项目,这两个项目的有机结合将提供能力超强、应用广泛的水下成像系统。当时,已有数个这样的项目在实施,大多为军事应用。CSS用自已开发的SAS系统与BluefinAUV集成,在2003年完成了初步实验。
CSS的AUV/合成孔径声呐系统名为RELIANT/SAS21系统,据称是第一个结合了AUV及SAS技术的水雷对抗实验系统。其载体AUV的型号是Reliant,由Bluefin公司开发,长约3m,直径约0.53m。
SAS21系统双侧、双频同时工作,低频为15kHz~32kHz,高频为165kHz~195kHz。高低频发射波形与功率独立编程控制。低频分辨率为7:62cm×7:62cm;高频分辨率为2:54cm×2:54cm。
⒊HISAS1030+HUGIN1000MRAUV
HISAS1030是KongsbergMaritime(KM)公司在原型机“Sensotech”的基础上研发的多子阵干涉合成孔径声呐,适装于AUV。其主要技术指标为分辨率优于5cm×5cm(理论值2cm×2cm);速度为2m/s时,工作距离为200m,速度为1.5m/s时,工作距离为275m;干涉测深分辨率为5cm×5cm~50cm×50cm;频率范围为60kHz~120kHz;带宽为50kHz。2008年2月,在挪威奥斯陆海湾进行了海试,水深50m~100m,AUV高度约为25m。
五、合成孔径聚焦技术在无损检测及医学成像上的发展
自20世纪60年代末及70年代初,同样是为了改善沿换能器移动方向的分辨率,合成孔径原理就已经试图应用于超声成像。在20世纪七八十年代,合成孔径主要是用于无损检测,采用收发共置换能器,如图6所示。
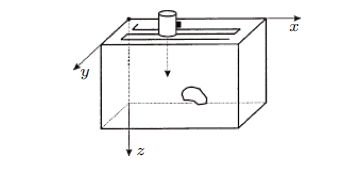
图6 收发共置换能器无损检测A-扫描数据采集
合成孔径聚焦技术(SAFT)利用机电扫描系统,控制换能器沿预定路径移动,在预定位置发射并接收试样中缺陷反射的回波信号。换能器位置、发射信号及回波信号波形全部存储在系统中。合成孔径聚焦处理程序在设定的深度内对回波信号做线聚焦(2D-SAFT)或点聚焦(3D-SAFT)处理。2D-SAFT的信噪比可以提高8~10dB,3D-SAFT可以提高16~18dB。
20世纪八九十年代,SAFT主要用于焊缝无损检测,还可用于薄壁及厚壁部件无损检测。图7是一个非常厚的部件,壁厚325mm。采用2MHz横波斜探头,探测到75mm深的裂隙。45◦斜入射探头沿钻孔内壁扫描,裂隙在外壁。经破坏性探查核实,裂隙深度与SAFT-成像结果符合,误差±2mm。
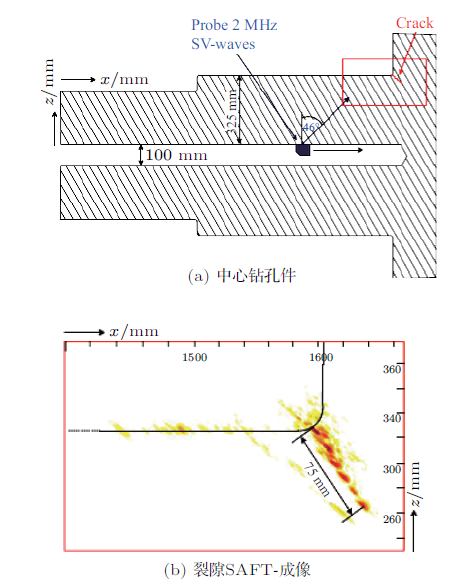
图7 中心钻孔件与裂隙SAFT-成像
换能器线阵应用到合成孔径超声成像后,有不同的实现方式。最简单的系统是合成孔径聚焦方式。其模式如图8所示,换能器线阵有N个阵元,每次只激活一个阵元发射,接收回波信号并存储在系统中。依次由阵元1至N重复N次后,由系统中调取数据相干叠加,得到高分辨声图。
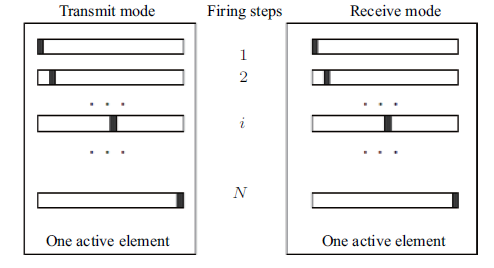
图8 合成孔径聚焦的发射及接收
为了提高信噪比,每次可以激活M>1个阵元,称为多阵元合成孔径聚焦(M-SAF),其模式如图9所示。
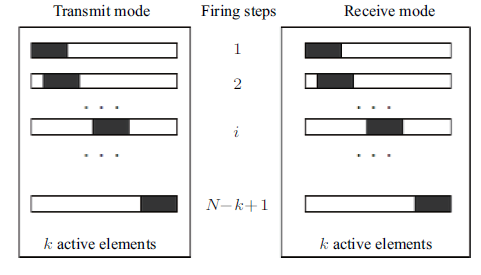
图9 多阵元合成孔径聚焦的发射及接收(M=K)
发射时只激活一个阵元,线阵中的全部阵元接收回波,称为“发射合成孔径”(STA),其模式如图10所示。
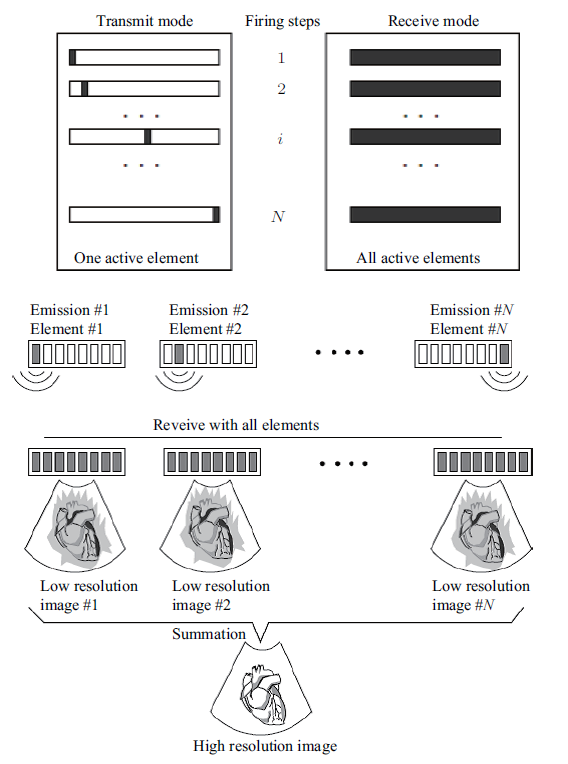
图10 发射合成孔径的发射及接收
为了提高声图刷新率,可以应用“稀疏发射合成孔径(SparseSTA)”模式,其模式如图11所示。稀疏发射合成孔径模式在每次发射时,激活N/M>1个阵元,全部阵元接收回波信号。一帧数据采样结束后,调取全部M×N个回波信号用于重建声图。
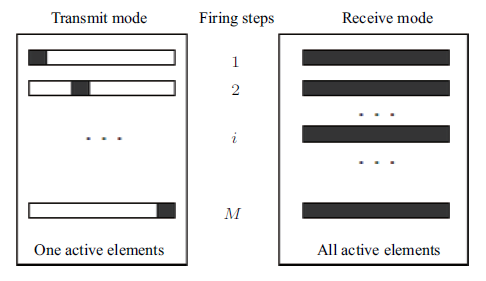
图11 稀疏发射合成孔径的发射及接收
接收合成孔径(SRA)的模式如图12所示。发射时,激活全部阵元;接收时,将线阵分为Ns=N/KR个子阵。每发射一次,一个接收子阵将KR个阵元接收到的回波信号叠加并存储。然后,向同方向发射同样的脉冲信号,其他子阵按序接收回波,叠加并存储。最后,调出所有子阵的回波信号,相干处理形成高分辨声图。
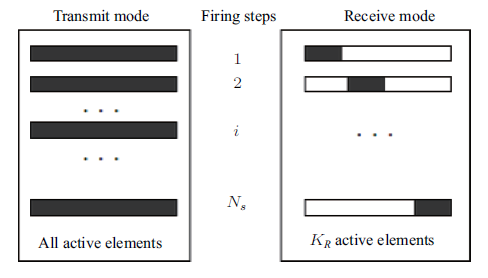
图12 接收合成孔径的发射及接收
六、结论
自20世纪50年代至今,合成孔径在雷达地面、海面成像中的研发及应用已经进入了黄金时代,实际分辨率远远超出了初期的设想。但是,系统误差,尤其是机载雷达运动误差降低了实际能达到的分辨能力。受多变的海洋环境影响,运动误差检测与补偿对提高合成孔径声呐的实际分辨率尤为重要,始终是受到关注的研发课题。自20世纪七八十年代以来,合成孔径成像已应用到无损检测及医疗诊断方面,有效地提高了超声成像的分辨率及信噪比,其研发及应用推广受到了多方关注。此外,在合成孔径技术的各方面应用中,3D-成像及目标自动识别与分类都是研究热点。
END
【作者简介】文/孙宝申,男,1944年出生,天津人,中国科学院声学研究所,研究员,研究方向为声学成像;本文来自《应用声学》(2018年第5期),参考文献略,用于学习与交流,版权归作者及出版社共同拥有。
作者:孙宝申,来源:溪流之海洋人生
来源:合成孔径成像的应用及发展 - RFASK射频问问
关于RFASK射频问问
射频问问是在"微波射频网”系列原创技术专栏基础上升级打造的技术问答学习平台,主要围绕射频芯片、微波电路、天线、雷达、卫星等相关技术领域,致力于为无线通信、微波射频、天线、雷达等行业的工程师,提供优质、原创的技术问答、专栏文章、射频课程等学习内容。更多请访问:RFASK射频问问 - 射频技术研发服务平台 | 技术问答、专栏文章、射频课程