建设集团网站方案设计创意设计之都
目录
什么是类?
类的引入
class
类的两种定义方式:
声明与定义分离
类的访问限定符号
访问限定符编辑
C++中struct和class的区别是什么?
封装
类的作用域
类的实例化
类对象模型
如何计算类对象的大小
this指针
C语言和C++实现Stack的对比
C语言实现
C++实现
什么是类?
在C++中,类(Class)是一种用户自定义的数据类型,用于封装数据和方法。它是面向对象程序设计的基本概念之一,通过将相关的数据和方法捆绑在一起,可以更加清晰和灵活地组织代码。
类可以看作是一个模板或者蓝图,用于创建对象(Object)。类定义了对象的属性(成员变量)和行为(成员函数)。成员变量是类的数据成员,用于存储对象的状态;成员函数是类的成员操作,用于操作和访问对象的状态。
通过使用类,能够将数据和操作封装在一起,实现了数据的隐藏和封装,提供了更好的代码重用性和可维护性。同时,类还支持继承机制,允许创建一个类继承另一个类的属性和方法,进一步提高了代码的灵活性和可扩展性。 c语言与c++的区别:
-
C语言是面向过程的,关注的是过程,分析出求解问题的步骤,通过函数调用逐步解决问题。
-
C++是基于面向对象的,关注的是对象,将一件事情拆分成不同的对象,靠对象之间的交互完成。
C语言更像是人们用双手进行洗衣服,不仅需要自己准备洗衣服相关的物品 而C++则是只需人们讲衣服放进洗衣机,洗衣机讲帮你完成这一过程,并且无需关心是如何洗好的
类的引入
C语言结构体中只能定义变量,在C++中,结构体内不仅可以定义变量,也可以定义函数。比如: 之前在数据结构初阶中,用C语言方式实现的栈,结构体中只能定义变量;现在以C++方式实现, 会发现struct中也可以定义函数
//c++兼容C结构体用法typedef struct ListNode{int val;struct ListNode* next;}LTN;//C的结构体类型是 struct ListNode//C++把结构体升级成了类//类是一个整体struct Stack{void Init(int n=4)//缺省参数{a=(int*)malloc(sizeof(int)*n);if(nullptr==a){perror("malloc is fail");return;}capacity=n;size=0;}void Push(int x){//...a[size++]=x;}int* a;int size;int capacity;};int main(){Stack st;st.Init();st.Push(1);st.Push(2);st.Push(3);return 0;}但在C++中一般用class进行类的定义(或C++中更喜欢用class代替)
class
class className{// 类体:由成员函数和成员变量组成 }; // 一定要注意后面的分号class为定义类的关键字,ClassName为类的名字,{}中为类的主体,注意类定义结束时后面分号不能省略。
类体中内容称为类的成员:类中的变量称为类的属性或成员变量; 类中的函数称为类的方法或者 成员函数。
struct Stack{//成员函数void Init(int n=4){a=(int*)malloc(sizeof(int)*n);if(nullptr==a){perror("malloc is fail");return;}capacity=n;size=0;}//成员变量 位置任意 int* a;int size;int capacity;};类的两种定义方式:
-
声明和定义全部放在类体中,需注意:成员函数如果在类中定义,编译器可能会将其当成内 联函数处理
class Person{public:void Show(){//...}public:char* _name;char* _sex;int _age;}; -
声明与定义分离
//Stack.hclass Stack{//成员函数void Init(int n=4);void Push(int x);//成员变量 int* a;int size;int capacity;};//Stack.cpp#include "Stack.h"void Stack::Init(int n){a=(int*)malloc(sizeof(int)*n);if(nullptr==a){perror("malloc is fail");return;}capacity=n;size=0;}void Stack::Push(int x){//...}//注意:缺省值的定义一般是在声明时定义
类的访问限定符号
访问限定符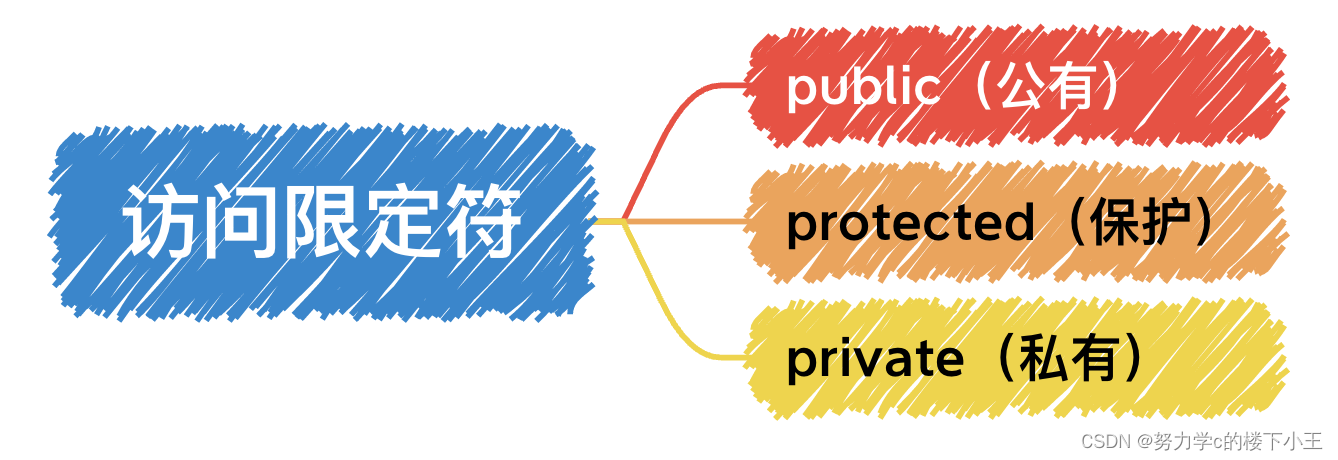
【访问限定符说明】
1.public修饰的成员在类外可以直接被访问
2.protected和private修饰的成员在类外不能直接被访问(此处protected和private是类似的)
3. 访问权限作用域从该访问限定符出现的位置开始直到下一个访问限定符出现时为止
4.如果后面没有访问限定符,作用域就到 } 即类结束。
5.class的默认访问权限为private,struct为public(因为struct要兼容C) 注意:访问限定符只在编译时有用,当数据映射到内存后,没有任何访问限定符上的区别
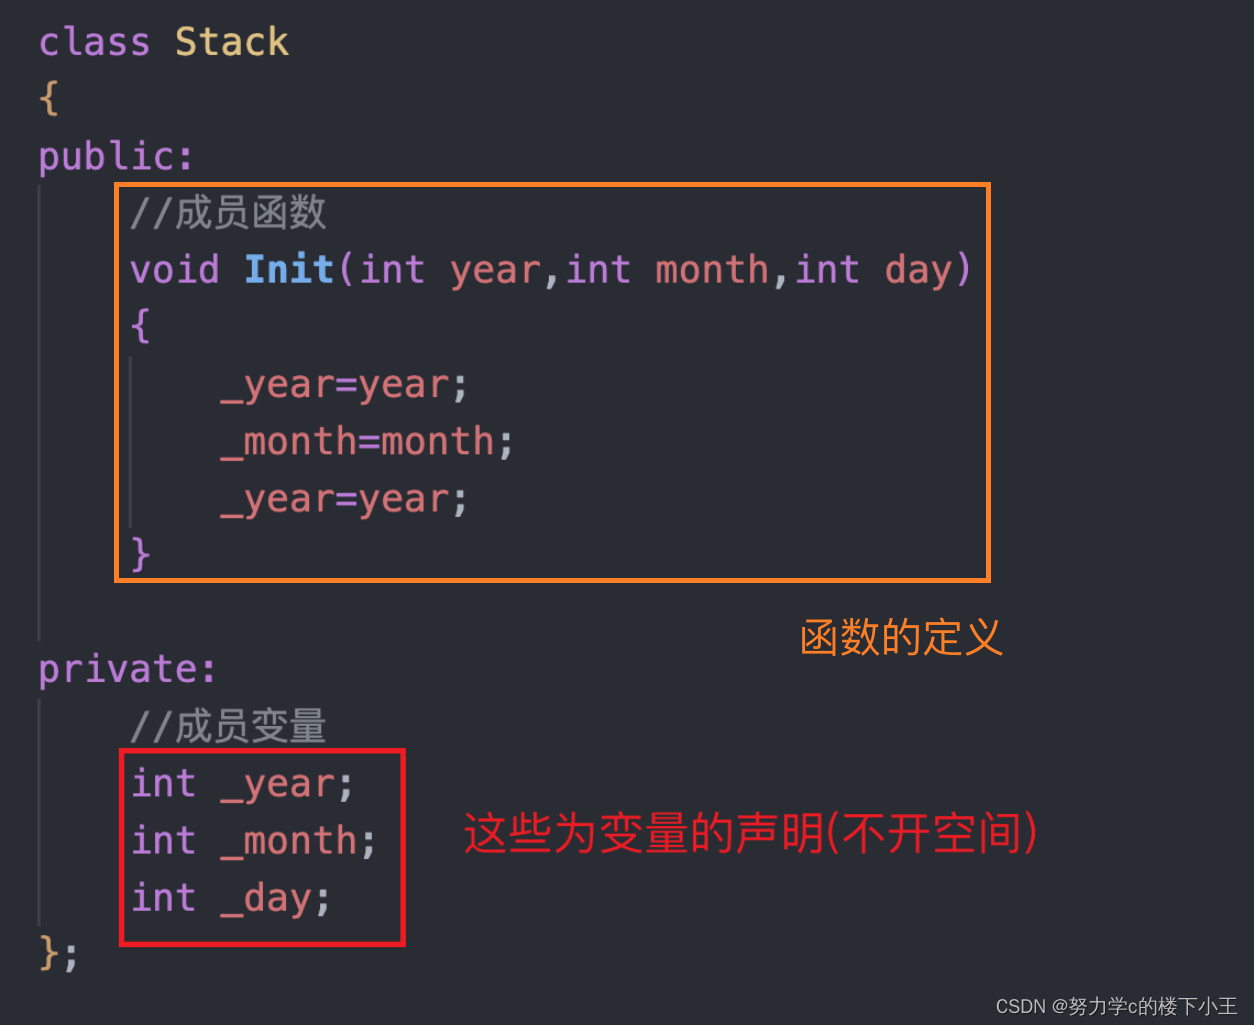
class Stack{public://成员函数void Init(int n=4);void Push(int x);private://成员变量 int* a;int size;int capacity;};
注意:成员变量命名时,一般都会在定义变量名字前后➕_ 以防混淆,如:class D{public://成员函数void Init(int year,int month,int day){_year=year;_month=month;_year=year;}private://成员变量 int _year;int _month;int _day;};C++中struct和class的区别是什么?
C++需要兼容C语言,所以C++中struct可以当成结构体使用。另外C++中struct还可以用来 定义类。和class定义类是一样的,区别是struct定义的类默认访问权限是public,class定义的类 默认访问权限是private。注意:在继承和模板参数列表位置,struct和class也有区别
封装
封装:将数据和操作数据的方法进行有机结合,隐藏对象的属性和实现细节,仅对外公开接口来和对象进行交互。
封装本质上是一种管理,让用户更方便使用类。比如:对于电脑这样一个复杂的设备,提供给用 户的就只有开关机键、通过键盘输入,显示器,USB插孔等,让用户和计算机进行交互,完成日 常事务。但实际上电脑真正工作的却是CPU、显卡、内存等一些硬件元件。
类的作用域
类定义了一个新的作用域,类的所有成员都在类的作用域中。在类体外定义成员时,需要使用 :: 作用域操作符指明成员属于哪个类域。
class Person{public:void PrintPersonInfo();private:char _name[20];char _gender[3];int _age;};// 这里需要指定PrintPersonInfo是属于Person这个类域void Person::PrintPersonInfo(){cout << _name << " "<< _gender << " " << _age << endl;}类的实例化
用类类型创建对象的过程,称为类的实例化
-
类是对对象进行描述的,是一个模型一样的东西,限定了类有哪些成员,定义出一个类并没 有分配实际的内存空间来存储它;比如:入学时填写的学生信息表,表格就可以看成是一个 类,来描述具体学生信息。
类就像谜语一样,对谜底来进行描述,谜底就是谜语的一个实例。
-
一个类可以实例化出多个对象,实例化出的对象 占用实际的物理空间,存储类成员变量
Person类是没有空间的,只有Person类实例化出的对象才有具体的年龄。
int main() {Person._age = 100; // 编译失败:error C2059: 语法错误:“.”return 0; } -
做个比方。类实例化出对象就像现实中使用建筑设计图建造出房子,类就像是设计图,只设 计出需要什么东西,但是并没有实体的建筑存在,同样类也只是一个设计,实例化出的对象 才能实际存储数据,占用物理空间
定义时才开空间(类对象的实例化)
//类-设计图纸class Data{public://成员函数void Init(int year,int month,int day){_year=year;_month=month;_year=year;}private://声明int _year;int _month;int _day;};int main(){//类对象实例化 -- 开空间//实例化 -- 用设计图建造房子Data d1;Data d2;return 0;} 错误用法:
类对象模型
如何计算类对象的大小
class Data{public://成员函数void Init(int year,int month,int day){_year=year;_month=month;_year=year;}//声明int _year;int _month;int _day;};int main(){Data d1;Data d2;d1.Init(2077,2,2); d1._year++;cout<<sizeof(d1)<<endl;//12return 0;} 为什么 d1 是12字节?
成员函数就像是公共设施,在计算大小时只需要将属于自己的进行计算即可 每个对象成员变量是不一样的,需要单独存储,每个对象调用成员函数是一样的,放到共享区域(代码段)
此处计算占有大小也存在内存对齐问题(内存对齐问题具体讲解C语言:自定义类型(结构体,枚举,联合)-CSDN博客)
结构体内存对齐规则
第一个成员在与结构体偏移量为0的地址处。
其他成员变量要对齐到某个数字(对齐数)的整数倍的地址处。
注意:对齐数 = 编译器默认的一个对齐数 与 该成员大小的较小值。
VS中默认的对齐数为8
结构体总大小为:最大对齐数(所有变量类型最大者与默认对齐参数取最小)的整数倍。
如果嵌套了结构体的情况,嵌套的结构体对齐到自己的最大对齐数的整数倍处,结构体的整 体大小就是所有最大对齐数(含嵌套结构体的对齐数)的整数倍。
// 类中既有成员变量,又有成员函数 class A1 {public:void f1(){}private:int _a;};// 类中仅有成员函数 class A2 { public:void f2() {}};// 类中什么都没有---空类 class A3{}; sizeof(A1)=4;sizeof(A2)=1;sizeof(A3)=1;这是为什么呢?sizeof(A2)=1; sizeof(A3)=1; 这1字节仅仅是用来占位的,表示对象存在,被实例化
this指针

这就引入了this,此处this是编译器自动生成的,无需自定义,进行自定义也会报错

当然这样写是正确的,此处写与不写都一样
那this存放在哪里?-- 存放才栈上,应为它是隐含形参
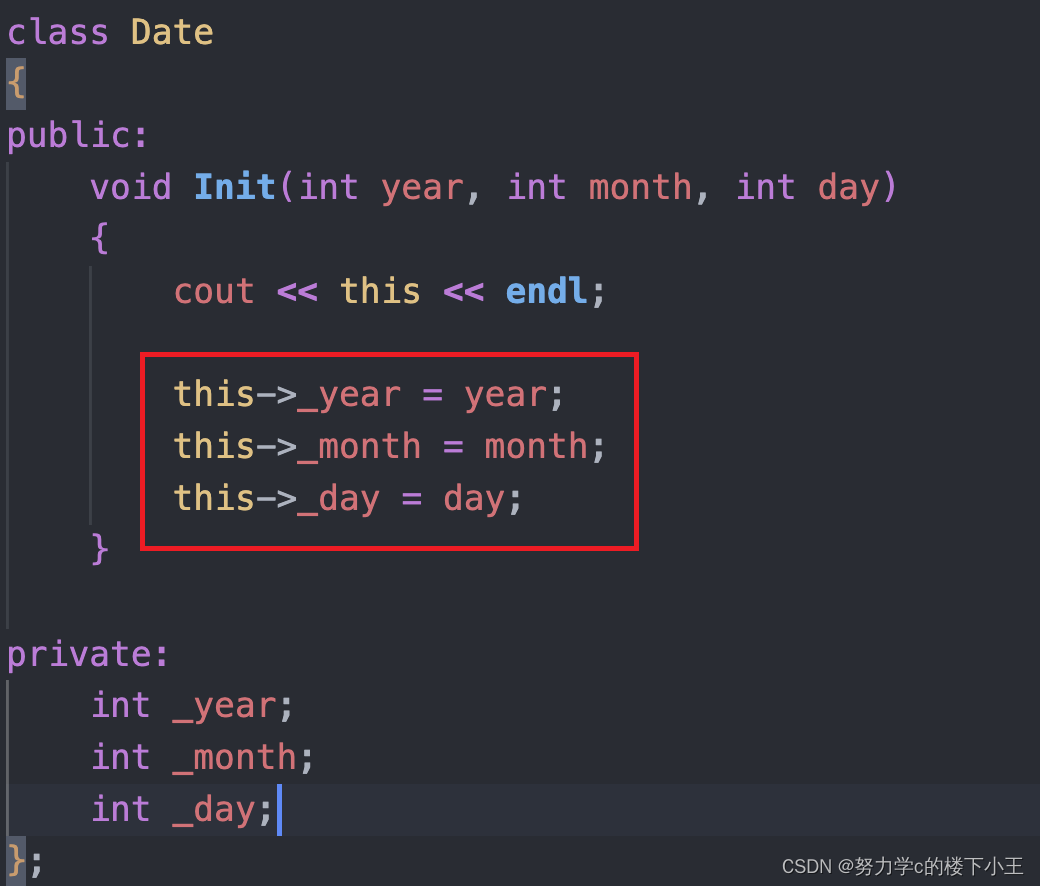
Date类中有 Init 与 Print 两个成员函数,函数体中没有关于不同对象的区分,那当d1调用 Init 函数时,该函数是如何知道应该设置d1对象,而不是设置d2对象呢? C++中通过引入this指针解决该问题,即:C++编译器给每个“非静态的成员函数“增加了一个隐藏 的指针参数,让该指针指向当前对象(函数运行时调用该函数的对象),在函数体中所有“成员变量”的操作,都是通过该指针去访问。只不过所有的操作对用户是透明的,即用户不需要来传递,编 译器自动完成。
// 下面程序编译运行结果是? A、编译报错 B、运行崩溃 C、正常运行 class Date{public:void Init(int year,int month,int day){cout << this << endl;this->_year = year;this->_month = month;this->_day = day;}void Print(){cout << this << endl;cout << "Print()" << endl;} private:int _year;int _month;int _day;};int main() {Date* ptr = nullptr;ptr->Print(); //正常运行//ptr->Init(2077,2,2); //运行崩溃return 0;}ptr->Print(); 正常运行的原因: 调用成员函数要调用成员指针,此时ptr传递给了this,此时this指针本身为空不报错
ptr->Init(2077,2,2); 运行崩溃的原因: 此处调用了this (this->_year = year;)对this进行了解引用
ptr->Print();//正常运行(*ptr).func();//正常运行正常运行的原因:有没有解引用的行为取决于右边要访问的对象在不在对象里面,而不是有没有用那个符号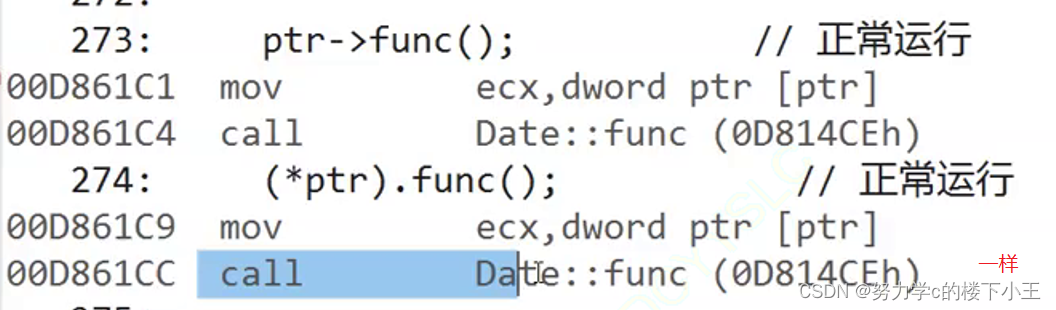
C语言和C++实现Stack的对比
C语言实现
typedef int DataType;typedef struct Stack{DataType *array;int capacity;int size;} Stack;void StackInit(Stack *ps){assert(ps);ps->array = (DataType *)malloc(sizeof(DataType) * 3);if (NULL == ps->array){assert(0);return;}ps->capacity = 3;ps->size = 0;}void StackDestroy(Stack *ps){assert(ps);if (ps->array){free(ps->array);ps->array = NULL;ps->capacity = 0;ps->size = 0;}}void CheckCapacity(Stack *ps){if (ps->size == ps->capacity){int newcapacity = ps->capacity * 2;DataType *temp = (DataType *)realloc(ps->array, newcapacity * sizeof(DataType));if (temp == NULL){perror("realloc申请空间失败!!!");return;}ps->array = temp;ps->capacity = newcapacity;}}void StackPush(Stack *ps, DataType data){assert(ps);CheckCapacity(ps);ps->array[ps->size] = data;ps->size++;}int StackEmpty(Stack *ps){assert(ps);return 0 == ps->size;}void StackPop(Stack *ps){if (StackEmpty(ps))return;ps->size--;}DataType StackTop(Stack *ps){assert(!StackEmpty(ps));return ps->array[ps->size - 1];}int StackSize(Stack *ps){assert(ps);return ps->size;}int main(){Stack s;StackInit(&s);StackPush(&s, 1);StackPush(&s, 2);StackPush(&s, 3);StackPush(&s, 4);printf("%d\n", StackTop(&s));printf("%d\n", StackSize(&s));StackPop(&s);StackPop(&s);printf("%d\n", StackTop(&s));printf("%d\n", StackSize(&s));StackDestroy(&s);return 0;}可以看到,在用C语言实现时,Stack相关操作函数有以下共性: 每个函数的第一个参数都是Stack* 函数中必须要对第一个参数检测,因为该参数可能会为NULL 函数中都是通过Stack*参数操作栈的 调用时必须传递Stack结构体变量的地址
结构体中只能定义存放数据的结构,操作数据的方法不能放在结构体中,即数据和操作数据 的方式是分离开的,而且实现上相当复杂一点,涉及到大量指针操作,稍不注意可能就会出错。
C++实现
typedef int DataType;class Stack{public:void Init(){_array = (DataType *)malloc(sizeof(DataType) * 3);if (NULL == _array){perror("malloc申请空间失败!!!");return;}_capacity = 3;_size = 0;}void Push(DataType data){CheckCapacity();_array[_size] = data;_size++;}void Pop(){if (Empty())return;_size--;}DataType Top(){return _array[_size - 1];}int Empty(){return 0 == _size;}int Size(){return _size;}void Destroy(){if (_array){free(_array);_array = NULL;_capacity = 0;_size = 0;}}private:void CheckCapacity(){if (_size == _capacity){int newcapacity = _capacity * 2;DataType *temp = (DataType *)realloc(_array, newcapacity *sizeof(DataType));if (temp == NULL){perror("realloc申请空间失败!!!");return;}_array = temp;_capacity = newcapacity;}}private:DataType *_array;int _capacity;int _size;};int main(){Stack s;s.Init();s.Push(1);s.Push(2);s.Push(3);s.Push(4);printf("%d\n", s.Top());printf("%d\n", s.Size());s.Pop();s.Pop();printf("%d\n", s.Top());printf("%d\n", s.Size());s.Destroy();return 0;}C++中通过类可以将数据 以及 操作数据的方法进行完美结合,通过访问权限可以控制那些方法在 类外可以被调用,即封装,在使用时就像使用自己的成员一样,更符合人类对一件事物的认知。 而且每个方法不需要传递Stack的参数了,编译器编译之后该参数会自动还原,即C++中Stack 参数是编译器维护的,C语言中需用用户自己维护
c:
1.数据都是分离的
2.数据访问控制是自由的,不受限制
c++:
1.数据和方法都封装到类里面
2.控制访问方式,给你访问公有,不能访问私有