如何把自己做的网站放到内网理财p2p网站开发
目录
一 Thymeleaf的简介
1.1 Thymeleaf的概念
1.2 Thymeleaf的优势
1.3 物理视图和逻辑视图
二 Thymeleaf的HelloWorld
2.1 加入jar包
2.2 配置上下文参数
2.1.3 创建Servlet基类
2.4 入门案例代码
三. Thymeleaf的基本语法
3.1 th名称空间
3.2 表达式语法
3.2.1 修改标签文本值
3.2.2 修改指定属性值
3.2.3 解析URL地址
3.3 域对象在Thymeleaf中的使用
3.3.1 回顾域对象
3.3.2 回顾域对象的类型
3.3.3 在Thymeleaf中操作域对象
3.4 获取请求参数
3.4.1 获取请求参数的语法
3.4.2 根据一个参数名获取一个参数值
3.4.3 根据一个参数名获取多个参数值
3.5 内置对象
3.5.1 内置对象的概念
3.5.2 基本内置对象
3.5.3 公共内置对象
3.6 OGNL
3.6.1 OGNL的概念
3.6.2 对象图的概念
3.6.3 OGNL语法
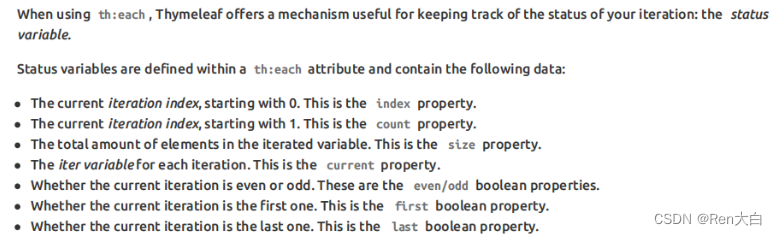
3.7 分支与迭代
3.7.1 分支
3.7.2 迭代
3.8 Thymeleaf包含其他模板文件
3.8.1 应用场景
3.8.2 操作步骤
一 Thymeleaf的简介
1.1 Thymeleaf的概念
Thymeleaf是一款用于渲染XML/XHTML/HTML5内容的模板引擎。类似JSP,Velocity,FreeMaker等, 它也可以轻易的与Spring MVC等Web框架进行集成作为Web应用的模板引擎。它的主要作用是在静态页面上渲染显示动态数据
1.2 Thymeleaf的优势
-
SpringBoot官方推荐使用的视图模板技术,和SpringBoot完美整合。
-
不经过服务器运算仍然可以直接查看原始值,对前端工程师更友好。
<!DOCTYPE html>
<html lang="en" xmlns:th="http://www.thymeleaf.org">
<head><meta charset="UTF-8"><title>Title</title>
</head>
<body><p th:text="${username}">Original Value</p></body>
</html>
1.3 物理视图和逻辑视图
① 物理视图
在Servlet中,将请求转发到一个HTML页面文件时,使用的完整的转发路径就是物理视图
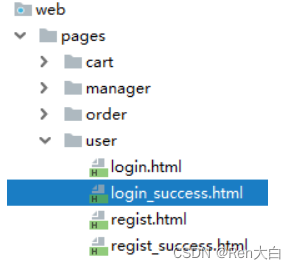
/pages/user/login_success.html
如果我们把所有的HTML页面都放在某个统一的目录下,那么转发地址就会呈现出明显的规律:
/pages/user/login.html
/pages/user/login_success.html
/pages/user/regist.html
/pages/user/regist_success.html
……
路径的开头都是:/pages/user/
路径的结尾都是:.html
所以,路径开头的部分我们称之为视图前缀,路径结尾的部分我们称之为视图后缀。
② 逻辑视图
物理视图=视图前缀+逻辑视图+视图后缀
上面的例子中:
| 视图前缀 | 逻辑视图 | 视图后缀 | 物理视图 |
|---|---|---|---|
| /pages/user/ | login | .html | /pages/user/login.html |
| /pages/user/ | login_success | .html | /pages/user/login_success.html |
二 Thymeleaf的HelloWorld
2.1 加入jar包
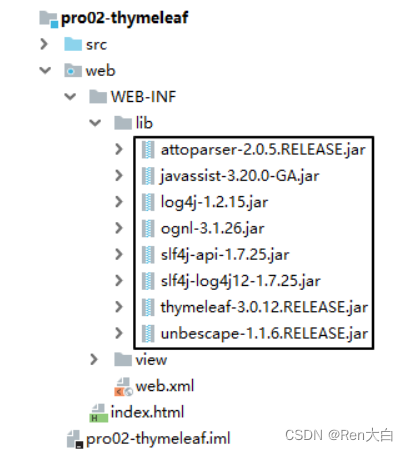
jar包在baidu网盘中 提取码 [6666]
百度网盘 请输入提取码
2.2 配置上下文参数
物理视图=视图前缀+逻辑视图+视图后缀
<!-- 在上下文参数中配置视图前缀和视图后缀 -->
<context-param><param-name>view-prefix</param-name><param-value>/WEB-INF/view/</param-value>
</context-param>
<context-param><param-name>view-suffix</param-name><param-value>.html</param-value>
</context-param>
说明:param-value中设置的前缀、后缀的值不是必须叫这个名字,可以根据实际情况和需求进行修改。
为什么要放在WEB-INF目录下?
原因:WEB-INF目录不允许浏览器直接访问,所以我们的视图模板文件放在这个目录下,是一种保护。以免外界可以随意访问视图模板文件。
访问WEB-INF目录下的页面,都必须通过Servlet转发过来,简单说就是:不经过Servlet访问不了。
这样就方便我们在Servlet中检查当前用户是否有权限访问。
那放在WEB-INF目录下之后,重定向进不去怎么办?
重定向到Servlet,再通过Servlet转发到WEB-INF下
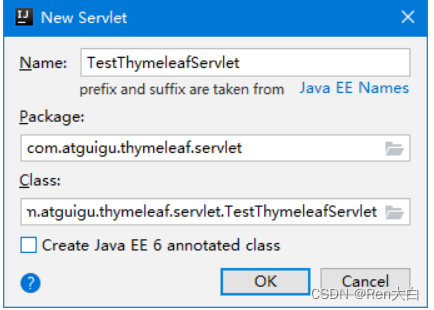
2.1.3 创建Servlet基类
这个类大家直接复制粘贴即可,将来使用框架后,这些代码都将被取代。
import org.thymeleaf.TemplateEngine;
import org.thymeleaf.context.WebContext;
import org.thymeleaf.templatemode.TemplateMode;
import org.thymeleaf.templateresolver.ServletContextTemplateResolver;import javax.servlet.ServletContext;
import javax.servlet.ServletException;
import javax.servlet.http.HttpServlet;
import javax.servlet.http.HttpServletRequest;
import javax.servlet.http.HttpServletResponse;
import java.io.IOException;public class ViewBaseServlet extends HttpServlet {private TemplateEngine templateEngine;@Overridepublic void init() throws ServletException {// 1.获取ServletContext对象ServletContext servletContext = this.getServletContext();// 2.创建Thymeleaf解析器对象ServletContextTemplateResolver templateResolver = new ServletContextTemplateResolver(servletContext);// 3.给解析器对象设置参数// ①HTML是默认模式,明确设置是为了代码更容易理解templateResolver.setTemplateMode(TemplateMode.HTML);// ②设置前缀String viewPrefix = servletContext.getInitParameter("view-prefix");templateResolver.setPrefix(viewPrefix);// ③设置后缀String viewSuffix = servletContext.getInitParameter("view-suffix");templateResolver.setSuffix(viewSuffix);// ④设置缓存过期时间(毫秒)templateResolver.setCacheTTLMs(60000L);// ⑤设置是否缓存templateResolver.setCacheable(true);// ⑥设置服务器端编码方式templateResolver.setCharacterEncoding("utf-8");// 4.创建模板引擎对象templateEngine = new TemplateEngine();// 5.给模板引擎对象设置模板解析器templateEngine.setTemplateResolver(templateResolver);}protected void processTemplate(String templateName, HttpServletRequest req, HttpServletResponse resp) throws IOException {// 1.设置响应体内容类型和字符集resp.setContentType("text/html;charset=UTF-8");// 2.创建WebContext对象WebContext webContext = new WebContext(req, resp, getServletContext());// 3.处理模板数据templateEngine.process(templateName, webContext, resp.getWriter());}
}
2.4 入门案例代码
① 创建index.html文件
② index.html编写超链接访问Servlet
<a href="/webday08/TestThymeleafServlet">初步测试Thymeleaf</a>③ 创建Servlet
<servlet><servlet-name>testThymeleafServlet</servlet-name><servlet-class>com.atguigu.servlet.TestThymeleafServlet</servlet-class>
</servlet>
<servlet-mapping><servlet-name>testThymeleafServlet</servlet-name><url-pattern>/testThymeleaf</url-pattern>
</servlet-mapping>
④ 修改Servlet让其继承ViewBaseServlet
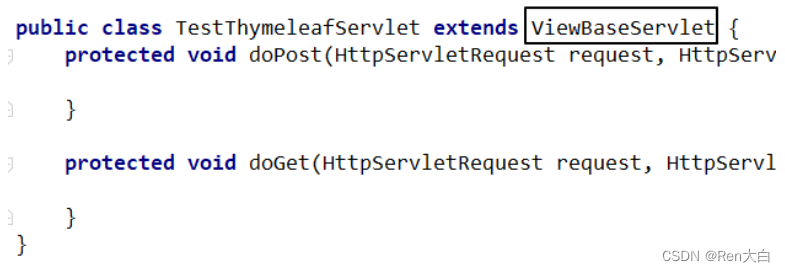
⑤ 在doPost()方法中跳转到Thymeleaf页面
package com.atguigu.servlet;import javax.servlet.ServletException;
import javax.servlet.http.HttpServletRequest;
import javax.servlet.http.HttpServletResponse;
import java.io.IOException;/*** @author chenxin* 日期2021-06-13  09:15*/
public class TestThymeleafServlet extends ViewBaseServlet {@Overrideprotected void doPost(HttpServletRequest request, HttpServletResponse response) throws ServletException, IOException {doGet(request, response);}@Overrideprotected void doGet(HttpServletRequest request, HttpServletResponse response) throws ServletException, IOException {request.setAttribute("username","奥巴马");//请求转发跳转到/WEB-INF/view/target.htmlprocessTemplate("target",request,response);}
}
⑥ Thymeleaf页面代码
<!DOCTYPE html>
<html lang="en" xmlns:th="http://www.thymeleaf.org"><head><meta charset="UTF-8"><title>目标页面</title></head><body><h1 th:text="${username}">这里要显示一个动态的username</h1></body>
</html>
三. Thymeleaf的基本语法
3.1 th名称空间
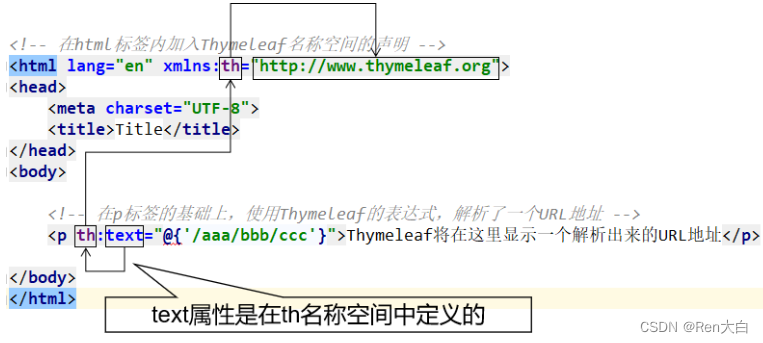
3.2 表达式语法
3.2.1 修改标签文本值
代码示例:
<p th:text="标签体新值">标签体原始值</p>① th:text作用
-
不经过服务器解析,直接用浏览器打开HTML文件,看到的是『标签体原始值』
-
经过服务器解析,Thymeleaf引擎根据th:text属性指定的『标签体新值』去替换『标签体原始值』
3.2.2 修改指定属性值
代码示例:
<input type="text" name="username" th:value="文本框新值" value="文本框旧值" />语法:任何HTML标签原有的属性,前面加上『th:』就都可以通过Thymeleaf来设定新值。
3.2.3 解析URL地址
代码示例:
<!--
使用Thymeleaf解析url地址
此种用法后面再说
-->
<a th:href="@{/index.html}">访问index.html</a>
经过解析后得到:
/webday08/index.html
所以@{}的作用是在字符串前附加『上下文路径』
这个语法的好处是:实际开发过程中,项目在不同环境部署时,Web应用的名字有可能发生变化。所以上下文路径不能写死。而通过@{}动态获取上下文路径后,不管怎么变都不怕啦!
① 首页使用URL地址解析
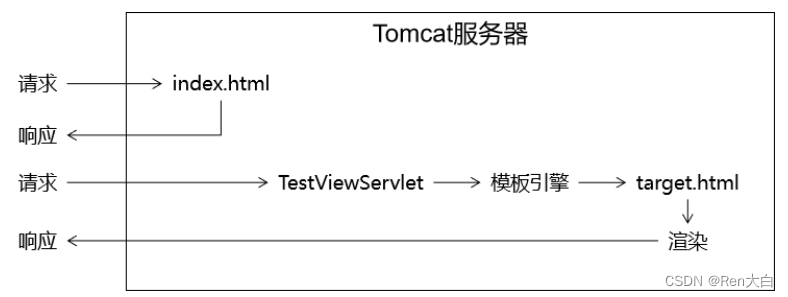
如果我们直接访问index.html本身,那么index.html是不需要通过Servlet,当然也不经过模板引擎,所以index.html上的Thymeleaf的任何表达式都不会被解析。
解决办法:通过Servlet访问index.html,这样就可以让模板引擎渲染页面了:
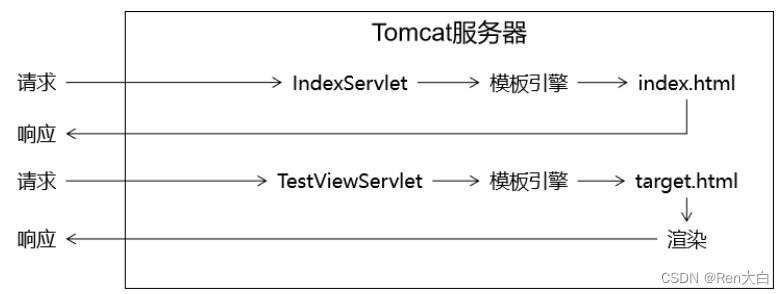
进一步的好处:
通过上面的例子我们看到,所有和业务功能相关的请求都能够确保它们通过Servlet来处理,这样就方便我们统一对这些请求进行特定规则的限定。
3.3 域对象在Thymeleaf中的使用
3.3.1 回顾域对象
域对象是在服务器中有一定作用域范围的对象,在这个范围内的所有动态资源都能够共享域对象中保存的数据
3.3.2 回顾域对象的类型
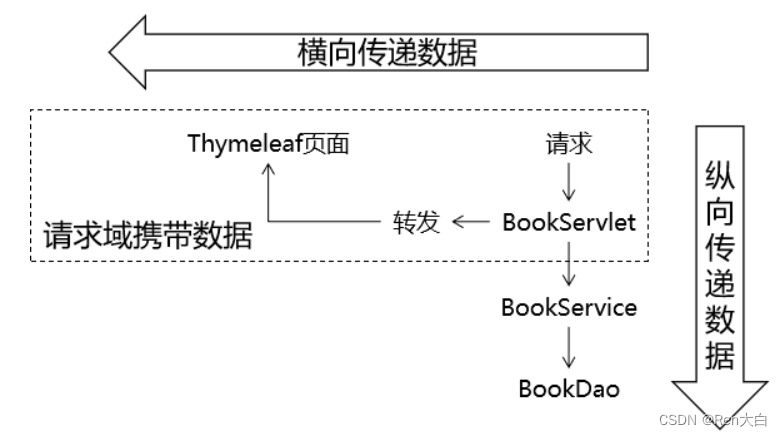
① 请求域
在请求转发的场景下,我们可以借助HttpServletRequest对象内部给我们提供的存储空间,帮助我们携带数据,把数据发送给转发的目标资源。
请求域:HttpServletRequest对象内部给我们提供的存储空间
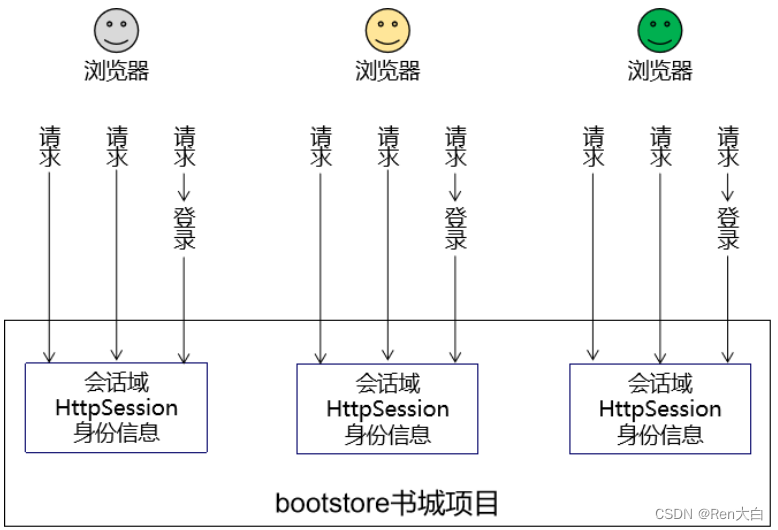
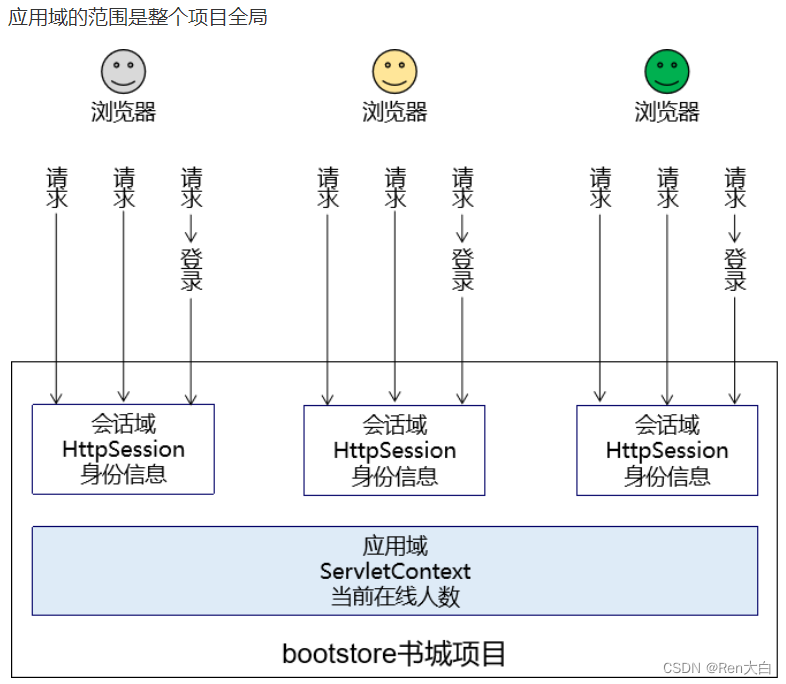
② 会话域
会话域的范围是一次会话
③ 应用域
3.3.3 在Thymeleaf中操作域对象
我们通常的做法是,在Servlet中将数据存储到域对象中,而在使用了Thymeleaf的前端页面中取出域对象中的数据并展示
① 操作请求域
Servlet中代码:
String requestAttrName = "helloRequestAttr";
String requestAttrValue = "helloRequestAttr-VALUE";request.setAttribute(requestAttrName, requestAttrValue);
Thymeleaf表达式:
<p th:text="${helloRequestAttr}">request field value</p>3.4 获取请求参数
3.4.1 获取请求参数的语法
${param.参数名}
3.4.2 根据一个参数名获取一个参数值
页面代码:
<p th:text="${param.username}">这里替换为请求参数的值</p>页面显示效果:

3.4.3 根据一个参数名获取多个参数值
页面代码:
<p th:text="${param.team}">这里替换为请求参数的值</p>页面显示效果:
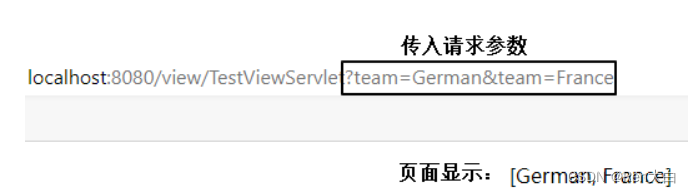
如果想要精确获取某一个值,可以使用数组下标。页面代码:
<p th:text="${param.team[0]}">这里替换为请求参数的值</p>
<p th:text="${param.team[1]}">这里替换为请求参数的值</p>
页面显示效果:
3.5 内置对象
3.5.1 内置对象的概念
所谓内置对象其实就是在Thymeleaf的表达式中可以直接使用的对象
3.5.2 基本内置对象
用法举例:
<h3>表达式的基本内置对象</h3>
<p th:text="${#request.getContextPath()}">调用#request对象的getContextPath()方法</p>
<p th:text="${#request.getAttribute('helloRequestAttr')}">调用#request对象的getAttribute()方法,读取属性域</p>
基本思路:
-
如果不清楚这个对象有哪些方法可以使用,那么就通过getClass().getName()获取全类名,再回到Java环境查看这个对象有哪些方法
-
内置对象的方法可以直接调用
-
调用方法时需要传参的也可以直接传入参数
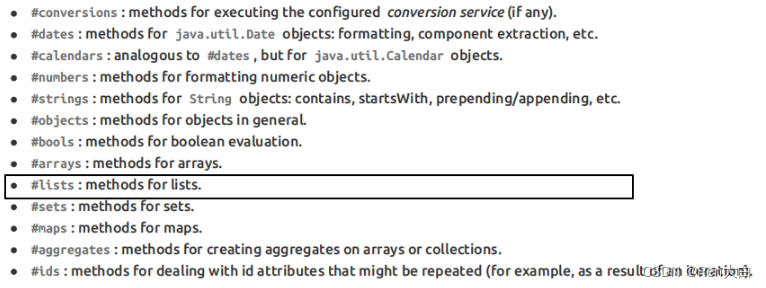
3.5.3 公共内置对象
Servlet中将List集合数据存入请求域:
request.setAttribute("aNotEmptyList", Arrays.asList("aaa","bbb","ccc"));
request.setAttribute("anEmptyList", new ArrayList<>());
页面代码:
<p>#list对象isEmpty方法判断集合整体是否为空aNotEmptyList:<span th:text="${#lists.isEmpty(aNotEmptyList)}">测试#lists</span></p>
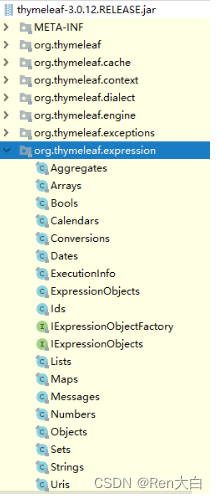
<p>#list对象isEmpty方法判断集合整体是否为空anEmptyList:<span th:text="${#lists.isEmpty(anEmptyList)}">测试#lists</span></p>公共内置对象对应的源码位置:
3.6 OGNL
3.6.1 OGNL的概念
OGNL:Object-Graph Navigation Language对象-图 导航语言
3.6.2 对象图的概念
从根对象触发,通过特定的语法,逐层访问对象的各种属性。

3.6.3 OGNL语法
① 起点
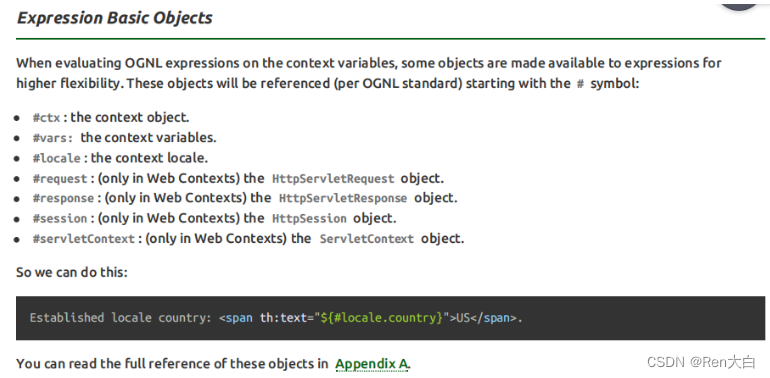
在Thymeleaf环境下,${}中的表达式可以从下列元素开始:
-
访问属性域的起点
-
请求域属性名
-
session
-
application
-
-
param
-
内置对象
-
request
-
session
-
lists
-
strings
-
② 属性访问语法
-
访问对象属性:使用getXxx()、setXxx()方法定义的属性
-
对象.属性名
-
-
访问List集合或数组
-
集合或数组[下标]
-
-
访问Map集合
-
Map集合.key
-
Map集合['key']
-
3.7 分支与迭代
3.7.1 分支
① if和unless
让标记了th:if、th:unless的标签根据条件决定是否显示。
示例的实体类:
package com.atguigu.bean;/*** 包名:com.atguigu.bean**/
public class Teacher {private String teacherName;public Teacher() {}public Teacher(String teacherName) {this.teacherName = teacherName;}public String getTeacherName() {return teacherName;}public void setTeacherName(String teacherName) {this.teacherName = teacherName;}
}
示例的Servlet代码:
protected void doGet(HttpServletRequest request, HttpServletResponse response) throws ServletException, IOException {// 1.创建ArrayList对象并填充List<Employee> employeeList = new ArrayList<>();employeeList.add(new Employee(1, "tom", 500.00));employeeList.add(new Employee(2, "jerry", 600.00));employeeList.add(new Employee(3, "harry", 700.00));// 2.将集合数据存入请求域request.setAttribute("employeeList", employeeList);// 3.调用父类方法渲染视图super.processTemplate("list", request, response);
}
示例的HTML代码:
<table><tr><th>员工编号</th><th>员工姓名</th><th>员工工资</th></tr><tr th:if="${#lists.isEmpty(employeeList)}"><td colspan="3">抱歉!没有查询到你搜索的数据!</td></tr><tr th:if="${not #lists.isEmpty(employeeList)}"><td colspan="3">有数据!</td></tr><tr th:unless="${#lists.isEmpty(employeeList)}"><td colspan="3">有数据!</td></tr>
</table>
if配合not关键词和unless配合原表达式效果是一样的,看自己的喜好。
② switch
<h3>测试switch</h3>
<div th:switch="${user.memberLevel}"><p th:case="level-1">银牌会员</p><p th:case="level-2">金牌会员</p><p th:case="level-3">白金会员</p><p th:case="level-4">钻石会员</p>
</div>
3.7.2 迭代
在迭代过程中,可以参考下面的说明使用迭代状态:
<!--遍历显示请求域中的teacherList-->
<table border="1" cellspacing="0" width="500"><tr><th>编号</th><th>姓名</th></tr><tbody th:if="${#lists.isEmpty(teacherList)}"><tr><td colspan="2">教师的集合是空的!!!</td></tr></tbody><!--
集合不为空,遍历展示数据
--><tbody th:unless="${#lists.isEmpty(teacherList)}"><!--
使用th:each遍历
用法:
1. th:each写在什么标签上? 每次遍历出来一条数据就要添加一个什么标签,那么th:each就写在这个标签上
2. th:each的语法    th:each="遍历出来的数据,数据的状态 : 要遍历的数据"
3. status表示遍历的状态,它包含如下属性:index 遍历出来的每一个元素的下标count 遍历出来的每一个元素的计数
--><tr th:each="teacher,status : ${teacherList}"><td th:text="${status.count}">这里显示编号</td><td th:text="${teacher.teacherName}">这里显示老师的名字</td></tr></tbody>
</table>
3.8 Thymeleaf包含其他模板文件
3.8.1 应用场景
抽取各个页面的公共部分:
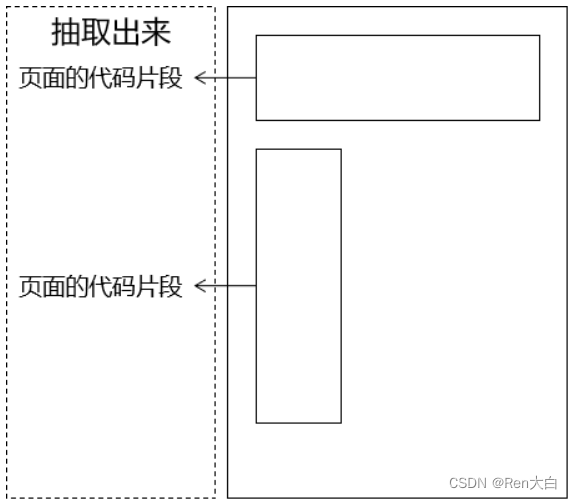
3.8.2 操作步骤
① 创建页面的公共代码片段
使用th:fragment来给这个片段命名:
<div th:fragment="header"><p>被抽取出来的头部内容</p>
</div>
② 在需要的页面中进行包含
| 语法 | 效果 | 特点 |
|---|---|---|
| th:insert | 把目标的代码片段整个插入到当前标签内部 | 它会保留页面自身的标签 |
| th:replace | 用目标的代码替换当前标签 | 它不会保留页面自身的标签 |
| th:include | 把目标的代码片段去除最外层标签,然后再插入到当前标签内部 | 它会去掉片段外层标记,同时保留页面自身标记 |
页面代码举例:
<!-- 代码片段所在页面的逻辑视图 :: 代码片段的名称 -->
<div id="badBoy" th:insert="segment :: header">div标签的原始内容
</div><div id="worseBoy" th:replace="segment :: header">div标签的原始内容
</div><div id="worstBoy" th:include="segment :: header">div标签的原始内容
</div>